Fly Patterns and Presentation
I always drop by a fly shop if I am away from my home waters. The price of bugs is generally the same, but the information is invaluable. Shop owners frequently buy regional and specialty flies from their guides. The fly patterns listed below will serve you well in your travels along Highway 395 in California or along Highway 97 in Oregon.
Keep in mind that each day shop outfitters send out their guides with the simple goal of getting their clients into fish, and everyday information is traded back and forth on what works, where it works and when it works. Shop owners and clerks readily pass on this information to first-time customers for half a dozen flies or less! Naturally, every shop has their killer flies that they use to expand the sale, but I don't believe that I have ever been duped. Fly shops have short seasons. In order to survive, they depend on customer loyalty, which in turn depends on their credibility. Regarding published hatch charts, take them with a grain of salt. Although I personally admire the dedication and perseverance that it takes to compile a hatch chart, the vagaries of Mother Nature generally render them in the category of "You should have been here last week." The best source of information will be from the local fly shops. Regardless of where you buy your flies, stay out of the bargain basement. Not all flies are tied equally.
For years I would shake my head in puzzlement when a client would open up his fly box and pull out a cheap and poorly tied fly. Rather than upset a client's out-of-state purchasing acumen for Montana trout flies, I would just resort to some swaps if I knew I was dealing with a tightfisted bargain hunter. Look for stiff neck hackles that will keep the fly high and dry. The next simple test is to look at the body to see if it is slender and proportionate. Finally, a good dry fly should have a three-point landing. When the fly is resting in the palm of your hand, the hackle and the tail should be aligned so that the bottom of the hook is barely resting on your palm. If the tail is too short, the fly will not land as well, nor will it offer the same profile to trout.
It is the fly that triggers the strike. The one topic guaranteed to generate instant conversation among fly anglers is the mention of fly patterns. No other facet of fly fishing evokes so much enthusiasm and reverence. Through the years many surveys have asked prominent fly fishers to share their favorite fly patterns. Lefty Kreh, in an article in Field and Stream, published February 1972, polled 12 expert fly fishers. The following list of dry flies, nymph flies and streamer flies represents a composite of the most frequently used flies for each category among these 12 experts.
* Dry Flies: Light Cahill, Adams, Royal Wulff, Irresistible, Quill Gordon, Humpy
* Nymphs: Trueblood Otter Shrimp, Quill Gordon, Ed Burk, Yellow Stone Fly, Muskrat, Woolly Worm
* Streamers: Black Nose Dace, Spruce Fly, Muddler Minnow, Gray Ghost, Black Marabou, White Marabou
Dan Abrams, in a similar type survey published in Sports Afield, October 1975, polled 30 notable fly fishers regarding their top four fly patterns. Seven of the 30 were prominent Rocky Mountain fly fishers. A generalized list of the most popular patterns produced the following: Adams, Royal Wulff, Humpy, Muddler Minnow and Gold-ribbed Hare's Ear Nymph. Add the Woolly Bugger and a Light Cahill in varying sizes and I would be content for quite some time. Well, of course, I would need to add a hopper pattern and a PMD and maybe a....
One of the great joys of fly fishing is sharing what works. If you are a beginner and meet a friendly fly fisher, pull out your fly box and ask, "Which one should I use?" I fondly recall many occasions when someone took me under their guidance and shared their secret fly for the day. Through the years my own collection of fly patterns grew in direct proportion to my fly fishing budget. Like most of the fly fishers I know, I can never have enough patterns. I have a number of match-the-hatch patterns for those special days, and I have my reliable stand-by attractor patterns and generic patterns that I started out with 40 years ago.
I have prioritized the following recommendations for the young beginner who has an empty fly box and a thin wallet. If you would like to begin tying your own flies, I highly recommend Jack Dennis's manual, Western Trout Fly Tying Manual. For a more in-depth approach to matching hatches, I recommend The Complete Book of Western Hatches by Rick Hafele and Dave Hughs.
For those of you who are new to the sport of fly fishing and have never fly fished in the Sierras or Cascades, I offer 20 patterns that will cover about 90% of the fishing from Glacier to Yellowstone. Be observant of what the trout are feeding on and use a small aquarium net to scoop up the bugs and look at them closely. Purchase a fly box with a foam backing and sort your dry mayfly patterns by color and size. For example, I start out with light, cream-colored Cahills and pro-gressively move across in increasingly darker shades to pale yellow, bright yellow, yellow-green, green, olive green and into the green-browns and finally mahogany and rust colors. I set up a separate row of gray and tan mayfly patterns. Personally, I am less concerned with Latin identification as I am with finding the right sized imitation in as close to the natural color as possible. Organizing my fly box in this manner helps me to locate a pattern quickly. It also reminds me what colors I am missing or what sizes I am missing. The following 20 patterns are the ones that "I never leave home without."
Dry Fly Patterns
Royal Wulff: Sizes 10-16
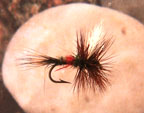
The Royal Wulff is the definitive attractor pattern. Created by the famed Lee Wulff, it imitates nothing, and yet it of-fers to the trout an equivalent of an exquisite Julia Child masterpiece. Derisively called the "Dude Fly" because of its white calf-tail wing, this extravaganza brings the fish up! Best of all, it is a fly the caster never fails to see. To digress for the beginner, keep in mind that you have to set the hook, as the trout will spit the fly out on its dive back into the water. Most beginners miss the take because by the time they react, the fish is safely on its way. Wear Polaroid sunglasses so that you can begin to train your eyes for underwater movement. Early detection allows you to react more quickly.
Presentation: Classic, upstream dead drift.
Humpy (Goofus Bug): Sizes 10-16
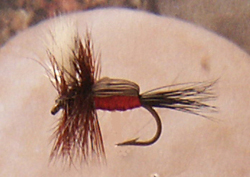
The Humpy's origin, according to Jack Dennis, is shrouded in controversy. Whether the fly originated in Jackson, Wyoming, or elsewhere is really unimportant. What is important to the beginner is that this fly works, and it is an indispensable pattern to have in your fly box. Although it is an attractor pattern, it may imitate a large caddis or stonefly in larger sizes. The fly is ideal for fast-flowing waters because of its inherent buoyancy. The Royal Humpy is especially easy to track in fast water. When sparsely tied, the Humpy works amazingly well on slow waters and can be used to imitate a Little Yellow Stonefly. The great advantage of this fly for the beginner is that it is almost unsinkable, and it offers great visibility in fast water for both the fisherman and the trout. It is, however, a most challenging pattern to tie. The best directions for tying this pattern may be found in The Second Fly-Tyers Almanac by Robert H. Boyle and Dave Whitlock.
Presentation: Classic, upstream dead drift. However, since this pattern closely resembles a caddis fly and floats so well, try drifting the fly downstream under willows or overhanging branches. As the fly drifts to the targeted area, lift the rod tip up to create an erratic skipping motion on top of the water, and then lower the rod tip quickly to allow the fly to drift once again on top of the water. Await the strike!
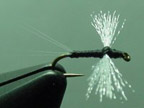
Renegade
It would appear that the Renegade attractor pattern has faded in popularity over the last 20 years, but it is a great fly for late evening fishing, as the white hackle in the front helps to see the fly on darkened waters. The second advantage is that the dual hackle design keeps the fly afloat when it is difficult to see after sundown. If you are new to the sport of fly fishing, be sure you have a good supply and a range of sizes for the Royal Wulff, the Humpy, the Renegade, the Adams and the Elk Hair Caddis.
Adams/Parachute Adams: Sizes 12-22
The ubiquitous Adams is probably the most widely used dry fly pattern on the North American continent. It imitates any number of gray mayflies. I highly recommend acquiring as many Adams in various sizes as possible. Because of the difficult visibility with this pattern, I have switched over exclusively to Parachute Adams for sizes 16-22. Although this is a generic type pattern, a size 20 Parachute Adams performs quite well during a Trico or Baetis hatch on slow moving water with a nine-foot leader and 6X tippet.
Trico
Blue-Wing Olive (Baetis)
The Trico spinner imitation has a small black body with divided white poly wings in the spinner position. During the heat of summer, get out on a Rocky Mountain river between 7 and 9 am (varies) for the Tricorithodes or Trico hatch followed by the spinner fall.
Although one of the smallest of mayfly species, nonetheless, this is a staple for feeding trout primarily because of the preponderant numbers during the spinner fall. Generally found in slower waters, the trout settle into a sipping, rhythmic rise form. Do not be deceived by the small rings and the dark noses - big fish! Fish in the morning during those dog days of August. I'm sure you will be delighted with the experience regardless of how many fish break off and get away. Because I have trouble seeing a small Trico, I often add on a small Trico as a trailer behind a small Parachute Adams.
Presentation: Classic, upstream dead drift.
Gray Drakes (Heptagenia and Siphlonurus) typically hatch throughout the summer starting in early June. Sizes 10-18.
Tricorythodes typically hatch late in the summer, usu-ally at the beginning of August. Sizes 20-26.
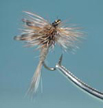
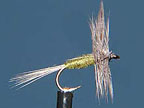
Light Cahill or PMD: Sizes 12-18
Cahill
Pale-Morning Dun
A light cream color Heptagenia mayfly imitation is another must have pattern. The Light Cahill pattern may also be used on slower waters and lakes to imitate Callibaetis. The Callibaetis dun body is olive-brown, however, so you may want to darken a few of your Light Cahills with a magic marker.
The Light Cahill can be used to imitate Ephemerella or Heptagenia mayflies, but be sure to closely inspect the size and color of the insect, and then match it with your color coded fly selection.
PMD - Pale Morning Dun
Pale Morning Duns are probably the most prolific and reliable hatch from Glacier to Yellowstone. These Ephemerella drake patterns should be part of your must-have patterns in sizes 16-22. PMDs hatch from June through October. Lighter in color from their cousins the Green Drakes, their bodies range from olive green to pale yellow and tan. The wings are generally slate gray to yellow. PMD cripples should be part of your collection.
Zug Bug
Gold-Ribbed Hare's Ear
Nymph patterns such as the Zug Bug, Gray Nymph and the Hare's Ear generally work well. The darker green patterns will work well during a Baetis hatch as well.
The famous Green Drake hatches (Ephemerella grandis) are typically from mid-June through mid-July. If you are in an area with a Green Drake hatch, be sure to stock up on a number of these drake patterns at the nearest fly shop. The hatch is generally not heavy, but if they are out, the trout are looking for them. Reports from guides returning to the shop will determine if you should buy traditional drake patterns or Compara Duns or Green Para-drakes. All of the above patterns range in color from pale yellow to green to olive brown. Stock up.
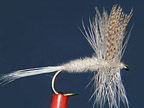
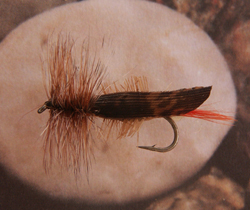
Elk Hair Caddis: Sizes 10-18
Unlike the graceful rise and gliding fall of the mayfly, a cad-dis hatch looks like a burst of kindergartners swarming over a playground. An accompanying soundtrack for a mayfly would be a Viennese waltz. Conversely, the caddis dance would be a rap soundtrack by Snoop Dogg. Generally, the caddis will hatch in the evening. The most popular body colors are brown, olive, green, gray and tan.
Caddis flies are not easily missed, and in the pupa and winged stages they are an important part of the trout's diet. Look for them in the quiet pocket water under willow branches or overhangs, especially in the evening. You may also want to select a few patterns for the emergent phase such as a sparkle pupa. For larger caddis imitations use a Humpy or an X-Caddis. Use a Goddard Caddis for fast, heavy water.
One of the guides I worked with collected the caddis cases and tied them on a Mustad hook with a peacock thorax. He fished them on a dead drift, and I was impressed! Beginning with the Grannom Caddis hatch in May, caddis emerge throughout the summer and fall. The most consistently popular pattern is the Elk Hair Caddis.
Presentation: Classic, upstream dead drift or erratic ac-tion produced by rod tip action.
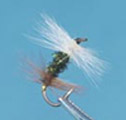
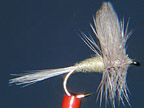
Blue-Wing Olive: Sizes 16-22
The Baetis (Blue-Wing Olive) is an important pattern in Montana, as Baetis hatch from May through October. They are generally smaller than a PMD. The body color for a Baetis pattern is olive brown with gray wings and light gray hackle. It is not uncommon for trout to be sipping the smaller Baetis during a hatch of PMDs.
Salmon Fly / Stimulator
Montana's favorite hatch calls for big bugs that hold up under heavy water conditions. They need to stay high and dry. The Salmon Fly pattern is constantly being reinvented and im-proved. During a Salmon Fly hatch, local shops have these flies displayed in tubs and buckets. The Salmon Fly hatch generally emerges late May and is essentially over by mid July. Water temperatures need to be in the low 50s.
Stimulator
The Stimulator represents a pattern for stone-flies in orange and yellow. When the trout quit hitting the big Salmon Fly patterns, they tend to strike at smaller stimulators long after the Salmon Fly hatch is over. The Stimulator is best used during a Golden Stonefly hatch.
Streamers and Wet Flies
Muddler Minnow: Sizes 4-8
Popularized by Dan Bailey of Livingston, Montana, the Muddler Minnow should always be in your fly box. I have met fly fishers who fish al-most exclusively with Muddler Minnow patterns. Along with its offshoot, the Marabou Muddler, this pattern has probably taken more large fish than any other fly. The Muddler may also be greased up and used as an effective hopper pattern, and I have used it both dry and wet on the same cast with interesting results.
Presentation: Fish the Muddler slightly upstream or down-stream in a quartering action. Retrieve the Muddler by simultaneously pumping the rod tip and stripping in the line in quick, little jerks which imitates the darting action of a sculpin minnow. Allow for pauses, and add weight if necessary.
Woolly Bugger: Sizes 4-8
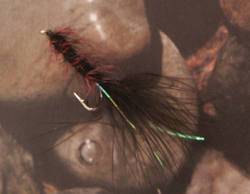
This pattern is a must for late spring and early summer when the water is high and off-color and the hatches are sporadic. If you are fishing from shore, make short casts around all the rocks and boulders. Be sure the fly is actually sinking to the bottom. Add lead to your leader if necessary. Use a short 2X or 3X leader. Make short casts and keep the rod tip high so that you keep the Bugger bouncing along the bottom. Lift the rod tip when you feel a bump. Do not assume it is just a rock. If it is, lower the rod tip and let the bugger sink again.
Yuk Bug and Girdle Bug: Sizes 6-12
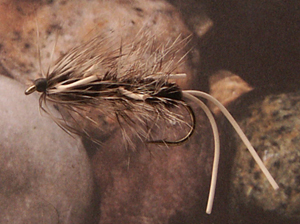
I love this bug! I have caught so many beautiful fish during early summer when the water is still high but clear. I float along until I find a logjam or flooded backwater eddy. I usually select a size 10 Yuk Bug. The Yuk Bug has a dark body wrapped with grizzly hackle. Protruding from the body are white rubber legs. I find I generally have to cut back on the length of the rubber legs. I want them to pulse, and I want them to flare at the sides rather than collapsing backwards. I do not use weight. I fish it like a dry fly, allowing it to gradually sink. Most important, I cast from a kneeling position. I am always amazed at how adept large trout are at hiding. As the Yuk Bug sinks into quiet water, the trout will slowly emerge from its hiding spot. I have had large trout appear from under a small tree trunk in shallow water. They never rush to the Yuk. They take their time. It also works well in creeks and small streams. I love this bug!
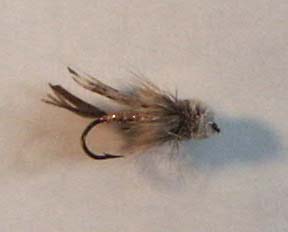
Nymphs: Hare's Ear Nymph: Sizes 12-16
In my opinion, this is the best of the small nymph patterns for spring creeks, beaver ponds and slow, flat stretches of river. When I fish high-elevation lakes, I always bring along the Hare's Ear Nymph and a Zug Bug in smaller sizes. They work wonders. If you have someone along who is not an accomplished fly caster, use a plastic water-filled bubble with as long of a leader as possible. Attach a Hare's Ear or Zug Bug and cast out as far as possible and retrieve with a spinning reel. If the fish are rising to the surface, be sure to cast way over them, as the splashdown from the water-filled bubble will spook the fish in the near vicinity.
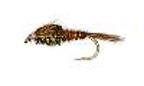
Bead-head Prince Nymph

This is perhaps the most popular nymph in the region! If you don't have any, head to the nearest fly shop. They work great as a dropper off a hopper pattern during the heat of August.
Pheasant Tail
The Pheasant Tail Nymph is an excellent soft hackle nymph for slow water. The key to this fly is a slender silhouette and a sparely-tied hackle.
Terrestrials
Hopper (Joe's, Dave's, Jay's, Dan's): Sizes 6-12
As you can see from the partial list of Hopper contributors, grasshopper imitations are recorded in the "Who's Who of Terrestrials". Rarely, however, will you find such citations on the bins in a fly shop. For beginners I recommend a clipped deer-hair collar. This feature adds stability and superior floatation. Although the grasshopper is meant to have a low silhouette, without the deer hair the buoyancy is drastically reduced and the caster generally struggles with a sinking pattern.
Presentation: The best source of information on hoppers can be found in the September 1985 issue of Fly Fisherman. In this issue Dave Whitlock, in his article "Hoppertunity", discusses hopper behavior, pattern characteristics and Hoppertunity Techniques. Here are a few of his suggestions: Being a terrestrial insect, the grasshopper is on unfamiliar "ground" when he gets blown on the water. No gentle landings here. Make a splash with your hopper. Strip the hopper in with intermittent twitches from rod-tip action. Use a heavy tippet, and use a twist piece of lead to sink the hopper in those promising pools. Cast close to undercut banks and overhangs where trout hide during low water periods. Fish during the heat of the day. Carefully pick your targeted area. Although a smashing hopper on top of the water will trigger a strike, it also quite often spooks fish in the outlying area. Keep moving and practice stealth.
Beetle Patterns
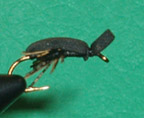
The deer hair patterns dyed black work wonders. Rick Hafele and Dave Hughes in their outstanding book, The Complete Book of Western Hatches, point out that the Woolly Worm is also a good pattern to imitate a water beetle in still or slow moving water.
Ant
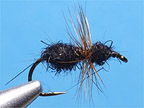
Although ant patterns are difficult to see in small sizes, ants are a staple diet for trout during the summer.
Bead-Head San Juan Worm
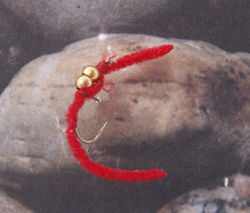
I have always had a certain amount of disdain for the San Juan Worm, but I have a growing appreciation for this pattern during the spring and again late in the fall. I favor the bead-head version with the bead in the center.
Well, there you have it - the 20 patterns that I would never leave home without!
Table of Contents
Introduction | Pre and Post Test
Step 1:Selecting Fly Rod and Reel
Step 2: Terminal equipment and Paraphernalia
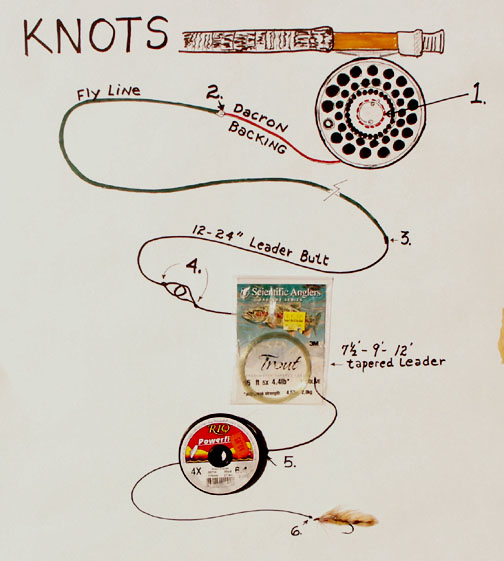
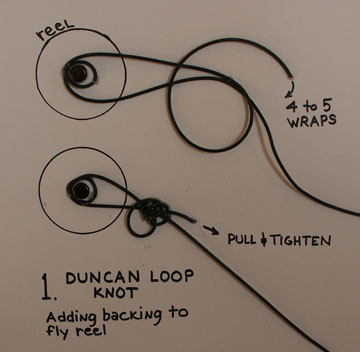
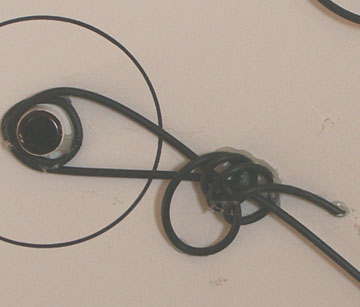
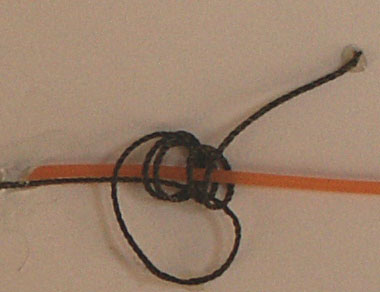
Step 3: Necessary Knots and Leaders
Step 4: Casting
Step 5: Basic Fly Patterns and Presentation
Step 6: Mastering the Basics of Creek Fishing
Step 7: Mastering the Basics of Stillwater Fly Fishing