David Archer: February 2007 Archives

By Doug Persico
About the author: Doug Persico is the owner of Rock Creek Fisherman's Mercantile, located at:
15995 Rock Creek Road
Clinton, MT 59825 (Exit Interstate 90 at Exit 126)
(406) 825-6440
http://www.rcmerc.com/storeindex.htm

Dead drifting a nymph on the bottom and fishing a nymph on or near the surface, either by itself or in tandem with another fly, are the two most productive methods of nymph fishing. Dead drifting simply means figuring out where the fish are holding on the bottom, weighting either the fly or the leader enough to get the fly down to where the fish are, and drifting the fly through the holding water until a fish takes it. Recognizing the take and setting the hook follow. Sounds simple, right? It is, until you consider such questions as, how do you know if you are deep enough, and how do you recognize the take.

The answer to the first question is easy. If you are getting hung up on the bottom and losing an occasional fly, you're deep enough. To answer the second question opens up one of the big debates currently in fly fishing -- are strike indicators nothing more than bobbers and an open acknowledgment that the fly fisher hasn't mastered his craft?

Most of my customers use strike indicators to recognize takes when dead drifting a nymph. Strike indicators are simply something the angler can see under any condition. They are attached to the leader far enough away from the fly so that they can be seen on the surface as the fly drifts on or near the bottom. The strike indicator telegraphs to the fisherman the fact that the nymph is no longer drifting. The angler must then quickly set the hook before the fish spits the fly out. Strike indicators are a valuable aid to increase productivity. As a fly shop owner, I make and sell indicators, and I consider them a valuable source of revenue for the shop.
The other method of nymphing used most often on Rock Creek is fishing a nymph unweighted either as a wet fly on the swing or as a trailer to a dry fly. To fish a nymph on the swing, simply cast across the current and start stripping line slowly in as the fly starts swinging below you. In most cases the fish will hook itself.

A technique that is becoming increasingly popular is to fish an emerger imitation in tandem with a dry fly during the hatches. A section of tippet is attached to the bend of a dry fly hook. The tippet section is from 16 to 18 inches long, and an emerger nymph is attached. The dry is drifted and catches fish in its own right as well as acts as a strike indicator for the trailing nymph. This method is proving itself deadly and increases in popularity every year.

For more information on Montana fly fishing, visit www.glaciertoyellowstone.com.

Glossary of Bass Fishing Terms

| Comments

Sources: I have made every effort not to turn this project into a research paper. I include only information that is widely accepted and published in numerous books and videos. When I gleam a valuable tidbit that I can not find in other sources, I have given the source within the text. At the end of the glossary, I have provided a bibliography listed by copyright year rather than alphabetical by author. This is the order that I have read these fine books beginning with Roland Martin’s book, 101 Bass-catching Secrets,
Copyrighted 1980.

A
Ambush Point:
Bass need cover to lie in wait for prey. They have great camouflage and easily go undetected.


B
Bass-
Smallmouth Bass:
Smallmouth bass are identified by their darker, vertical rays along their sides, as well as a copper, brown coloration, although color varies based on the environment. As their name implies, the smallmouth’s jaw ends before the eye, whereas the largemouth bass’s jaw extends past the eye. The smallmouth bass thrives in cooler rivers and creeks and targets crayfish. Smallmouth like cool water and seldom go deeper than their primary quarry, the crawfish. The In-Fisherman Handbook notes that the smallmouth bass’s jaw is adept at prying food of the bottom, whereas the largemouth tends to feed upwards more than a smallmouth.

Largemouth Bass: In addition to the larger mouth where the jaw extends past the eye, the largemouth has a distinguishing dark streak along its side, hence the name black bass and linesides.

Bed Fishing: After the female lays her eggs, she sticks around guarding the bed for a couple of days and then moves into deeper water to recuperate. Some of the largest females are taken during this vulnerable time. Bed fishing does not seem to have much controversy surrounding it, but some anglers question the practice. The males guard the eggs and attempt to chase off intruders or kill them rather than feed on them. They are known to pick up a plastic worm and remove it from the bed. Persistent harassment generally is met with a hook-up.

“Bumping the Stump” (object): Here is another tip from Roland Martin. Bounce your lure off a stump or dock piling. The primary advantage is the lure drops vertically along the target, and the stump takes the shock of the impact allowing for a relatively quiet entry into the water.

Buzz Bait: Somewhat similar to a spinnerbait, the Buzz Bait stays on top of the water and clicks and clacks. Keep a steady retrieve right to the boat. The Buzz Bait is a great searching lure, especially on quiet water. Roland Martin recommends using the Buzz Bait during hot weather with high water temperatures.

C
Carolina Rig:
Attach a swivel and an egg-shaped slip sinker approximately two feet up from the worm. Often used in brushy cover, the worm is typically embedded with a Styrofoam device to keep the worm floating up from the bottom. Many anglers like to open their bail so that when a bass takes the worm the bass does not feel any resistance as the line glides through the sinker. This method has the advantage of not prematurely ripping the bait from the bass’s lips and missing a hook-up. Experiment with embedding the hook or leaving it exposed.

Catch and Release: To avoid higher rates of mortality, reel in a caught bass quickly before it is depleted of oxygen, which can cause a build up of lactic acid which can lead to death after the bass slips away from your hands.

Cold Fronts: Considered the bane of bass anglers everywhere, cold fronts push bass out of the shallows into deeper water requiring persistence and new strategies.

Counting Down: Many sinking plugs are designed to fish within a broad range of depth. The technique is to count down the rate of sink until the lure reaches the bottom. Use this knowledge to vary the depth of the retrieve after a pre-determined count.

Cover: Cover refers to anything that a bass can hide in or be protected. The cover can be man made such as a dock or a weed bed or fallen tree. Weed growth provides a natural safe haven or cover for bass. Never pass up a dock, and be sure to cast to the shady side of the dock. Better yet, skip a tube worm under the dock!

Crank Baits: Floating at rest, these bait imitations dive at various depths. Keep in mind, however, that there are sinking crankbaits and neutral buoyancy crankbaits. This is a broad category with a plethora of offerings in every shop and catalog. The advantage of the Crankbait is that the bulbous body and the large plastic lip deflect the lure from under water branches and impediments during the retrieve. Select color patterns and size based on the forage fish available. For example, if you are fishing a reservoir where threadfin shad exist, select an appropriate profile. During cold weather slow the retrieve down considerably from faster retrieval rates during late spring and summer. Bass rod manufacturers typically recommend 6.5 to 7 foot rods for both distance casting and less strain on the wrist and shoulder. Numerous authorities recommend fine tuning a crankbait so that it turns either left or right, which has a distinct advantage when fishing around docks. (As of yet I have not experimented with this. I would love for a reader to respond.)

D
Dead sticking:
This method allows the jig or bait to rest on the bottom. It is characterized by extremely long waits followed by a slight twitch or slow retrieval. It works great targeting neutral bass (inactive, non-responsive bass).


E

F
Fall Fishing for Bass:
Probe the backs of creeks and the channels leading to the mouth of creeks.

Feeding patterns: Cold water slows a bass’s metabolism to the point that they will dine once a week or every two weeks. Essentially, providing that the temperature is optimal, bass feed out of hunger, from reflex actions and from a competitive nature when a school locates large numbers of shad or other minnows and goes on a feeding frenzy. If you miss a strike, cast again because maybe another bass missed the initial grab.

Floating Buoys: Tossed overboard to mark fish or structure, these self-unwinding buoys are great when the wind is blowing and your boat is drifting.

Frogging:

G
Gitzits:
See Tube Baits.

H

I
Inhaling their food
: Remember when your mother told you to slow down and stop inhaling your food? Not so for a bass. They open their mouth, flare their gills and suck in food. When they taste the morsel and find it hard, tasteless and unfit for bass consumption, they expel the object with the same basic process. Unless you are watching your line, you may be missing a fishing opportunity.

J
Jig and Eel (Jig and Pig):
When the water is cold, bass anglers often go to a lead-head jig with an attached pork rind. This method produces both in the spring and summer, but it requires patience and repetition as the angler slowly jigs over the side of the boat lifting the jig off the bottom over-and-over. Experiment with the lift and drop from six inches to two feet. The most popular color combination is brown and black with a pork trailer which imitates a crayfish.

Jigging with Grubs: Grubs are deep water lures using a plastic grub attached to a lead-head jig hook.
Jig Heads: Jig heads designs include a round head, banana head, a stand-up head, a football head, a keel-head and a slider head. Popular jig-hook sizes range from 3/0 to 5/0.

Jigging Spoons: Count down the fall of the spoon over ledges or structure. Vary the lift and fall pattern. The fluttering free-fall of the spoon attracts stationary bass in the near vicinity. A number of bass experts recommend jigging a spinnerbait as well.

K

L
Lateral Line:
Bass have a lateral line of nerve endings along each side of their flank which transmits water movement and pressure, which is why they can locate a prey in very muddy water.

Line Watching: Often a bass will suck in a plastic worm or jig and move slowly away before exhaling the foreign object. Watch for small line movement, especially when fishing a plastic worm.

M

N
Negative Bass:
This is a description characteristic of a bass in a non-feeding, unresponsive state. Quite simply it is a bass conserving its strength, a bass at rest as contrasted with an “active” bass searching for food.

Neutral Bass: A neutral bass is a non-feeding bass, but an angler may drop a lure or bait in very close proximity to the bass and trigger a reflex strike.

O

P

Pattern Fishing: Roland Martin in his book, 101 Bass Catching Secrets, defines “the word ‘pattern’ to mean the sum total of all the variables in the fishing situation….” For an excellent overview of pattern fishing read chapter 10 in Largemouth Bass an In-Fisherman Handbook of Strategies.

Pegged Sinker: If you are fishing in heavy cover with a Texas Rigged worm and a cone shaped slip sinker, jam a tooth pick into the sinker so it will not ride up or down the line, which makes it prone to hang-ups.

Poppers and Chuggers: These top water lures were traditionally used with a fly rod. Representing a wounded baitfish or a frog on top of the water, these balsa wood lures have a carved concaved mouth, which traps air and water on the retrieve. An alternative to a chugger is the Zara Spook, which has a smooth shaped head, which does not disturb the water and is an excellent choice on calm water.

Q

R
Rapala Lures:
I was recently corrected on my pronunciation of Rapala. That evening I returned to Roland Martin’s book, and sure enough, it is pronounced “Rap-ah-la”. Since its introduction from Finland in the 1950’s Rapala lures have taken a dominant position in the tackle market. These minnow imitations work well on all fresh water fish. (Wal-Mart seems to have the best prices but their selection is limited.)

Reflex Strike: Bass are opportunistic feeders. Sometimes they will flee a lure dropped on top of them, and at other times they instinctively react and strike at the bait or lure. Spinnerbaits are one of the most popular lures to entice reflex strikes. Bass are more apt to quickly react to a lure dropped in front of them when the water temperature ranges from 50 to 65 degrees.

S
Shallow flats
: Shallow flats from ten feet to twenty-five feet allow good weed growth, cover and forage, a perfect post spawn retreat.

Smell: Bass have acute smelling senses for prey, vegetation and the smell of their local waters. One has only to look at the research some companies spend in developing their secret bass catching scents. The one scent that bass can detect and find to be a deterrent is human scent along with other man-made odors.

Size: Who are we kidding? Size does matter, and a baby largemouth has a big appetite reaching a length of 5 to 7 inches by late fall!

Sound: Bass have exceptional hearing for great distances. (Use carpet on the bottom of your boat. Shhh! Lower that anchor quietly!) They also use their lateral lines, an elongated series of nerves down each side, to feel water pressure and movement, which is especially helpful in the dark and off-colored water for locating prey. Many lures employ rattles and other noise making devices to attract bass.

Spawning Behavior and the Yearly Cycle- (Varies by regional norms)
Pre-spawn: Warmer temperatures during the spring wake up appetites. Bass begin to move into shallower water, particularly the male who scouts ahead for a bedding site. Bass moving into the shallow waters typically are more aggressive and opportunistic regarding top water presentations. During early spring look for the wind protected shallow coves. Northern bays warm up sooner than southern bays. John Fox in his video says that if you don’t see turtles sunning, the bass won’t be in that bay.
Spawn: The male clears an area for a spawning bed and lures the female to the bed. Reproductive urges take precedence over feeding. Spawning typically takes place when the temperatures are in the low 60’s and at depths under ten feet. After the eggs are fertilized the female stays on the bed for a short duration and then turns over the nursery to the male who guards the bed until the fry are hatched. It is not uncommon for the male to feast on his offspring, which scatters the survivors to cover. Both the male and female are vulnerable to predation at this time. The larger female moves to deeper water to recuperate.
Postspawn: Considered a slow fishing period, the postspawn is a transitional period of recovery and unstable spring time weather. Bass gradually move to comfortable zones to spend the summer.
Early summer: Plant growth, insect emergence and an abundance of newly hatched fish provides a spike in active bass feeding and a boom to anglers.
Summer and Autumn: The dog days of summer require new fishing strategies if the water temperature climbs. As summer temperatures wane, bass react indifferently until the water cools decidedly or the lake turns over. When the lake bottom waters rise to the top, the result is a mixing and leveling of temperatures and oxygen levels. During this fall period fishing can slow down for period of time until the temperature stabilizes, usually in the 50’s range. One benefit is that bass tend to move out of their old haunts, and this movement translates into an opportunity for some lunker bass.
Winter: Brrrr! Inactive fish and hardcore anglers.

Split shotting: As the name implies, add a split shot (non-retractable) about two feet from a Texas rigged 4-inch worm in shallow water. Retrieve the bait at a slow to moderate speed.

Structure: Think of the contour of the lake and the features such as depressions, mounds, flats, old river channels, points, islands etc. Look for clues along the shoreline for gradual bottoms and steep drop-offs.

Suspended Bass: During colder periods of the year, bass will locate a comfort zone and suspend themselves through the use of their air bladder. Small movements up or down do not affect the equilibrium of a suspended bass. When a bass moves up or down the water column, it requires new energy, while the fish adjusts to the new level. Sometimes this may take more than an hour of adjustment. During cold water periods bass typically stay at the same depth to conserve energy.

T

Texas Rigged Worm: One of the more popular rigging for soft plastic worms, the hook is embedded inside the worm, which both conceals the hook and allows the worm to be fished weedless. A hardy hook-set is required to drive the hook through the soft plastic and into the bass’s mouth. Texas Rigged worms typically have a bullet shaped slip sinker to both sink the worm and drag it along the bottom. (Work a worm slow!)

Tidewater Fishing for largemouth bass and stripped bass:
High tide: High tides can be tough to fish because the high tides flood tulles and shore cover offering both feeding and cover for larger fish.
Falling tide: The falling tide is excellent to fish as when the water drops, fish move to the drop offs and can be caught in the transitional zones. Keep in mind, however, that by the time you launch your boat and motor to your targeted area, you can miss this window of opportunity.
Slack tide: Tidal movement pauses creating little water movement. Fishing slows during this short period.
Spring tide: Spring tides are generated by the gravitational pull of the moon during the new and full moon cycles, or every two weeks. California delta anglers head out to their favorite sloughs during spring tides because a spring tide has the highest high tides and the lowest low tides. Bass are forced out of cover during the low tide. Most tackle shops sell tide booklets for their regions.

Topographical Maps and Contour Lines: Almost every expert espouses studying the contour lines of a lake’s depth. Drop-offs, points and ledges typically hold concentrations of bass. Locating channels and underwater humps are also targets to locate and mark on a GPS. John Fox in his video reminds anglers to stay with a pattern until it no longer works. If you catch bass off a point in 25 feet of water, then race to the next point and target that particular 25 foot depth.

Tube Bait: Designed and first produced by the Garland brothers, the tube bait is a soft plastic lure shaped as an elongated tube with tentacles at the bottom. Originally named Gitzits, tube baits are used with a jigging hook and are an excellent lure for both smallmouth bass and largemouth bass. (Read my critique on the video, Gitzits with the Garland Brothers. This is an exceptionally good instructive tape that I highly recommend. For a copy of this tape, look up Bazz Clazz Videos on the Internet.

U

V
Vision of Bass:
Larry Larsen in his book, Mastering Largemouth Bass, points out that bass are slow to adjust to a change of light. It takes upwards of two hours after dusk before a largemouth eyes are “programmed for night vision.” (p24) If you are going to hang around after sun down, you might as well go in for a bite to eat. Our own eyes adjust much faster. Suffice to say, however, that bass have excellent eye sight and gather in much more light than humans

W
Water Color:
Dirty water fish shallow; clear water fish deep.

Water Temperature: Temperatures from 65 to 70 are said to be prime feeding temperatures.

Weather to Fish or Stay Home: John Weiss’ in his book, The Bass Angler’s Almanac, states that fish like weather stability without interruption. After three days of a weather pattern, the fishing picks up. Overcast skies and light rain create cover for foraging bass. However, an approaching cold front de-stabilizes temperatures and barometric pressure resulting in moody, inactive bass. John Fox in his video reminds viewers that the benefit of an approaching cold front is that bass go on a feeding binge prior to the front’s arrival. The cold front brings low barometric pressure, which generally moves the bass to the bottom.

Weedlines: When I was a fly fishing guide, I would pick a target for a client if he or she had not looked down river. I would tell them, “Take your time. Make your first cast count.” The same would be true when we would get out of the boat to fish a riffle or a pool. Quite often an eager fly caster would charge through the shallows to reach deeper water. Nothing spooks fisher faster than watching a spooked fish scream by them. Before you ease your boat into a cove or large pocket of weed growth, fish close in on both sides of the extended weed points. Create as little disturbance as possible with your casts before moving in to fish openings in the weed cover. Remember too that active bass typically cruise parallel to cover.

X

Y

Z

Bibliography:

Roland Martin’s one hundred and one Bass-catching Secrets by Roland Martin, Winchester Press Copyright 1980. ISBN: 0-8329-3095-4

Mastering Largemouth Bass, Complete Angler’s Library, North American Fishing Club, by Larry Larsen, Copyright 1989. ISBN: 0-914697-24-2

Largemouth Bass an In-Fisherman Handbook of Strategies by the In-Fisherman Staff and Staff Researchers, published by In-Fisherman, Copyright 1990. ISBN:0-929384-11-3 (Volume 7)

All-Color Bass Fishing Guide by Bill Herzog, Frank Amato Publications, Inc. Copyright 1995. ISBN: 1-57188-003-8

The Field and Stream Bass Fishing Handbook by Mark Sosin and Bill Dance and the Editors of Field & Stream, Copyright 1974, 1999. ISBN: 1-55821-895-5

The Bass Angler’s Almanac by John Weiss, The Lyons Press, Copyright 2001. ISBN: 1-58574-214-7

(Video) John Fox’s How, When & Where to Catch Bass, Outdoor Adventures Video Library


Video Review: Tube Worms

| Comments

The Gitzit!

gitzittape.jpg

Field and Stream’s April 2006 featured article, 50 Best Lures of All Time, lists the tube bait or Gitzit in the number 9 spot. The number 1 spot (drum roll, please) is the Gitzit’s first cousin, the Curly Tail Grub. Whether you agree with John Merwin’s placement has much to do with whether or not you have spent some real quality time with a Gitzit. Second place went to the Dardevle spoon, an all-around lure that attracts the full gamut of sport fish. Change the title to “50 Best Bass Fishing Lures of All Time,” and the Gitzit would more than likely be awarded the first or second spot.


Produced by Bazz Clazz Videos, Gitzits with the Garland Brothers is one of the best bass catching videos of the past 20 years. From the perspective of a retired high school English teacher and a devotee of Gitzits fishing for small mouth and large mouth bass in the Sacramento Delta, I would place this video somewhere in the top five positions of videos that actually teach, and where the results can be replicated by amateurs. Pro fisherman Dan Warme, an expert in his own right, carefully mines all the great tube bait fishing techniques from the inventors of the Gitzit, Bobby Garland and his brother Gary Garland.

The tube bait is just that. It is a slender, hollow, rubber tube in which the last 40% of the tube’s length is split or cut into tentacles. Hook size and weight is determined by the size of the tube bait, the depth to be fished and the time of descent as the tube spirals to the bottom. Probably the most common weight is a 1/16 or 1/8 oz. weight. Lead-head jig hooks are inserted through the top of the tube, exiting out the bottom. They may be rigged Texas style or they may be used with a weedless jigging hook or with a split-shot rigging. The Gitzit does it all. Add foam and it floats. Pull the lead-head back to create a pocket of air and it slowly spirals down to suspended fish. Best of all, when it comes to rest on the bottom, the tail stands up straight allowing the tentacles to breathe naturally with a rhythmic pulse, making it easier for a bass to locate and pick up in a soft, mucky bottom.
(photo 3)
Although I am comfortable with a bait-casting reel or a spinning reel in my hands, I never lose an opportunity to fish with my fly rod. I began my formative years as an angler fishing independently with my father’s fly rod in second grade in Bishop, California. Garden hackle, salmon eggs, crickets and hoppers were the bait of choice for trout and later blue gill in southern California during the fifties, the golden years. Had someone handed me a Gitzit, I would have been a passionate devotee for the rest of my life. Returning to California for the last four years of my teaching career, I stumbled upon Gary Garland’s tube baits (www.canyon-plastics.com) and had smashing success fishing for small mouth bass in the slows rivers surrounding Modesto. Some of the largest bass that I have caught was during the spawn fishing the smaller Gitzits on slow-moving rivers that dump into the San Joaquin River, a major tributary feeding the Sacramento River. If you are new to bass fishing, I highly recommend the video, “Gitzits with the Garland Brothers.” Take some along on your next bass fishing trip, and print up the Tips Sheet below. Since it is condensed information, cut and paste and then print and tape to a Gitzit box. If you really want to learn, take notes and chart your success.

Dave Archer

Dave’s Gitzit Tips from the Video and his Own Experience (Print, cut and paste on your Gitzit box.)

1. Always keep the Gitzit rigged straight.
2. Use a weedless lead-head hook for fishing the bottom and structure.
3. Fishing the fall: Use 1/16 oz. hooks or create an air pocket up front.
4. For pitching rig the Gitzit Texas style with a sliding bullet head sinker.
5. Fish the Gitzit with a split shot 18-inches up from the Gitzit to keep the Gitzit
floating up off the bottom.
6. Always watch the line for movement and soft takes.
7. Always cast over your target. Slowly reel back to the target and allow the
Gitzit to free-fall vertically to the bass or target. On a slow moving river,
cast upstream so the Gitzit free-falls to the target zone.
8. For best results, use a spinning reel with 8 to 10-pound line. Allow some
measure of drag for the take, but not too much to miss the hook set.
9. Fish white Gitzits for bass feeding on shad in open water, and paint on eyes if
you bury the lead-head for slower retrieves and minnow action.
10. For deep water retrieves, allow the Gitzit to sink on a set count. Reel five or
six time somewhat fast, pause and then give a SLIGHT twitch upwards. Repeat.
11. Use a skip cast to reach hard targets under trees and docks.
12. Color Selection:
Dark brown or pumpkin with flakes = crawfish imitations early in the morning
Smoke with Silver or translucence with flakes = mid morning, clear water
Cloudy day = electric grape
Pearl white = shad imitation
Chartreuse and green = sun fish
13. Fish the fall or the crawl! If you rig the lead-head outside the tube, you can cut
off part of the lead to slow the fall to spooky bass in shallow water.
14. Size counts! Size down for non- feeding fish or spooky fish and size up during
the bite.
15. Fish the Gitzit year-around.


5 Star Book Rating on Bass Fishing

| Comments

top3bassbooks.jpg

Beginning with Roland Martin’s book, 101 Bass-Catching Secrets, published in 1980, I have read nine popular bass fishing books. The latest bass fishing book that I have devoured is The Bass Angler’s Almanac by John Weiss, published in 1991 by Lyons Press. Although I highly recommend the book and enjoyed the Question:Answer format, my first choice for a comprehensive teaching book on bass fishing remains Largemouth Bass – An In-Fisherman Handbook of Strategies.

Like a good textbook, the chapters are logically organized and clearly introduced in the table of contents for future reviews. The book covers the history of bass fishing in this country, bass biology, bass survival and adaptability, bass distribution, pattern fishing, lures and equipment and much more. A new angler to bass fishing can easily be overwhelmed by specialized vocabulary and references to techniques and terminal gear when picking up a bass fishing magazine. They may ask themselves what a neutral bass is. Could it be a bass who doesn’t take sides in an environmental debate? Is it a half-way submerged or suspended bass? Naturally, most of these specialized terms may be understood with contextual clues. However, if a beginning angler doesn’t know what a Carolina or Texas rig is or the meaning of Wacky Style, he or she needs this book now. If you forgot the meaning of pelagic or seiche, no problem, the writing staff has provided a glossary at the back of the book.

Any good text book should be well balanced with photographs, charts, diagrams and cartoons. This handbook has all of that including data from research that directly impacts anglers on the water. In addition to the thoroughness in reviewing the categories of lures, the staff provides a strategy for pattern fishing for bass. The authors state that a “pattern includes three basic components: (1) circumstances such as season, time of day, cover, water clarity, and other factors; (2) location, or types of areas to fish (specific spots in water); and (3) presentation including lure type, tackle, and mode of presentation. A proven pattern states: ‘If certain conditions exist, bass will be active in a particular habitat and I can catch them by fishing a prescribed way.’” You will definitely catch more bass after studying this book. It’s a great read.

Dave Archer
www.bassandtroutfishingdigest.com

Great Bass Video for Beginners

| Comments

John Fox's, How, When & Where to Catch Bass

foxtape.jpg

When you know you have found something good, really good, you become a champion of that product. You want to share your find with others. I have found such a video in John Fox’s, How, When & Where to Catch Bass. Produced by Outdoor Videos in 1986, this two hour video has been a national bestseller for good reason. John Fox, nine time’s national bass fishing champion and host of the popular ESPN’s television series, Outdoor Adventures, methodically instructs the viewer in the nuances of bass fishing. If you have spent numerous hours viewing other bass fishing videos with grinning hosts in a fantasyland setting landing big fish after big fish, ask yourself this simple question. Did I learn from this instructional tape? Did I want to immediately rewind and start taking notes? Did I find myself nodding my head and thinking, “So that’s how they do it.” That was my reaction on viewing John Fox’s video. I found a used video on the internet of How, When & Where to Catch Bass. Later I found John Fox’s web site, www.trophybass.com. John, who is now 76, retired from television productions after 27 years. He presently runs a bass guiding service in Florida, and he sells his DVD from his site. Having been a fly fishing guide for almost twenty years, I read John’s policies for running his guide service. I was impressed.

John’s video is well organized. He begins with necessary information on understanding how a bass survives and adapts to his environment. He stresses boat handling techniques, and although his product endorsements are dated, I never felt like I was captive to a commercialized pitch. Essentially, as in trout fishing, John makes the point that 90% of the fish are in 10% of the lake, so it is essential that beginners learn to know where NOT to fish! The tape is organized by seasons so viewers may return to a season and review the information. What follows are just a few highlights from each of the four seasons John Fox covers.

Spring, regardless of the calendar date, activates bass when the surface water temperatures reach the low 50’s. Bass begin staging in 20 to 40 feet of water off shallow banks, as they prepare to spawn. John recommends top water lures such as spinnerbaits, buzz baits, spoons, crankbaits, plastics, and the ever popular Jig and Pig. Each of these lures is covered thoroughly, including color selection. Crawfish, a mainstay of the diet at this time, should be imitated with lures such as Bill Norman’s Deep or Shallow Little N in a crawfish pattern. One of the many tips John offers for spring fishing is to simply troll over likely staging areas with an electric trolling motor carefully monitoring the depth of the lure. Catch a few bass with a lure that is designed for a specific depth, and that is the depth you should fish for the rest of the day. Two truisms John offers for spring fishing are, “Bass live deep and eat shallow,” and when the “turtles are in the coves, the bass will be there too!”

Summer arrives when the temperatures climbs to the low 70’s. But as most anglers know, climatic changes and barometric changes can interfere with those weekends that anglers plan with optimism and hope for stable conditions. John teaches you how to fish successfully during those unstable conditions in the transition between spring and summer; after all, the fish may be picky, but they are still there. You just have to learn how to locate them and successfully pattern them. “When the barometric pressure is low, fish shallow. When the barometric pressure is high, fish deep.” John methodically reviews tips and techniques for targeting bass during the summer. From points to structure, from the shady side to the darker times of day, John covers it all. I was especially intrigued by his endorsement of the Color Selector, a product I have read much about. Cool summer nights prompt a turn over of the lake’s waters. In a matter of days, cooler waters from the bottom of the lake rise and force warmer water to the bottom. John Fox describes this phenomenon. The change is dramatic. Surface water temperatures go from low 80’s to low 70’s, and John details tactics to target fish.

Fall fishing is best described as searching for replicated patterns. John advises moving around, exploring, testing, and most importantly staying with a pattern that works. He recommends top water lures, buzz baits and Rat’l Traps fished in 2-15 feet of water. He focuses on shad patterns and fall locations where bass go on a feeding spurt in anticipation of winter.

Some of the most intriguing and informative tips that John shares are his successful winter fishing tactics. I was fascinated with his floating buoy markers and his vertical jigging tips. Finally, John Fox shares his secrets for fine tuning and rigging lures for all seasons. If you are serious about improving your catch rate, buy this video and start taking notes. This tape is everything you would expect from a two times Bass Champion of Champions and from a man who holds Florida’s State Big Bass Record five times in two years. Enjoy.

Dave Archer
www.bassandtroutfishingdigest.com


Top 20 Trout Flies

| Comments

Basic Fly Patterns and Presentation

tf-hopper2.jpg

I always drop by a fly shop if I am away from my home waters. The price of bugs is generally the same, but the information is invaluable. Shop owners frequently buy regional and specialty flies from their guides.

Keep in mind that each day shop outfitters send out their guides with the simple goal of getting their clients into fish, and everyday information is traded back and forth on what works, where it works and when it works. Shop owners and clerks readily pass on this information to first-time customers for half a dozen flies or less! Naturally, every shop has their killer flies that they use to expand the sale, but I don't believe that I have ever been duped. Fly shops have short seasons. In order to survive, they depend on customer loyalty, which in turn depends on their credibility. Regarding published hatch charts, take them with a grain of salt. Although I personally admire the dedication and perseverance that it takes to compile a hatch chart, the vagaries of Mother Nature generally render them in the category of "You should have been here last week." The best source of information will be from the local fly shops. Regardless of where you buy your flies, stay out of the bargain basement. Not all flies are tied equally.

fliesandfloatant.jpg


For years I would shake my head in puzzlement when a client would open up his fly box and pull out a cheap and poorly tied fly. Rather than upset a client's out-of-state purchasing acumen for Montana trout flies, I would just resort to some swaps if I knew I was dealing with a tightfisted bargain hunter. Look for stiff neck hackles that will keep the fly high and dry. The next simple test is to look at the body to see if it is slender and proportionate. Finally, a good dry fly should have a three-point landing. When the fly is resting in the palm of your hand, the hackle and the tail should be aligned so that the bottom of the hook is barely resting on your palm. If the tail is too short, the fly will not land as well, nor will it offer the same profile to trout.

It is the fly that triggers the strike. The one topic guaranteed to generate instant conversation among fly anglers is the mention of fly patterns. No other facet of fly fishing evokes so much enthusiasm and reverence. Through the years many surveys have asked prominent fly fishers to share their favorite fly patterns. Lefty Kreh, in an article in Field and Stream, published February 1972, polled 12 expert fly fishers. The following list of dry flies, nymph flies and streamer flies represents a composite of the most frequently used flies for each category among these 12 experts.

* Dry Flies: Light Cahill, Adams, Royal Wulff, Irresistible, Quill Gordon, Humpy
* Nymphs: Trueblood Otter Shrimp, Quill Gordon, Ed Burk, Yellow Stone Fly, Muskrat, Woolly Worm
* Streamers: Black Nose Dace, Spruce Fly, Muddler Minnow, Gray Ghost, Black Marabou, White Marabou

Dan Abrams, in a similar type survey published in Sports Afield, October 1975, polled 30 notable fly fishers regarding their top four fly patterns. Seven of the 30 were prominent Rocky Mountain fly fishers. A generalized list of the most popular patterns produced the following: Adams, Royal Wulff, Humpy, Muddler Minnow and Gold-ribbed Hare's Ear Nymph. Add the Woolly Bugger and a Light Cahill in varying sizes and I would be content for quite some time. Well, of course, I would need to add a hopper pattern and a PMD and maybe a....

One of the great joys of fly fishing is sharing what works. If you are a beginner and meet a friendly fly fisher, pull out your fly box and ask, "Which one should I use?" I fondly recall many occasions when someone took me under their guidance and shared their secret fly for the day. Through the years my own collection of fly patterns grew in direct proportion to my fly fishing budget. Like most of the fly fishers I know, I can never have enough patterns. I have a number of match-the-hatch patterns for those special days, and I have my reliable stand-by attractor patterns and generic patterns that I started out with 40 years ago.

I have prioritized the following recommendations for the young beginner who has an empty fly box and a thin wallet. If you would like to begin tying your own flies, I highly recommend Jack Dennis's manual, Western Trout Fly Tying Manual. For a more in-depth approach to matching hatches, I recommend The Complete Book of Western Hatches by Rick Hafele and Dave Hughs.

For those of you who are new to the sport of fly fishing and have never fished in Montana, I offer 20 patterns that will cover about 90% of the fishing from Glacier to Yellowstone. Be observant of what the trout are feeding on and use a small aquarium net to scoop up the bugs and look at them closely. Purchase a fly box with a foam backing and sort your dry mayfly patterns by color and size. For example, I start out with light, cream-colored Cahills and pro-gressively move across in increasingly darker shades to pale yellow, bright yellow, yellow-green, green, olive green and into the green-browns and finally mahogany and rust colors. I set up a separate row of gray and tan mayfly patterns. Personally, I am less concerned with Latin identification as I am with finding the right sized imitation in as close to the natural color as possible. Organizing my fly box in this manner helps me to locate a pattern quickly. It also reminds me what colors I am missing or what sizes I am missing. The following 20 patterns are the ones that "I never leave home without."
Dry Fly Patterns

Royal Wulff: Sizes 10-16

The Royal Wulff is the definitive attractor pattern. Created by the famed Lee Wulff, it imitates nothing, and yet it of-fers to the trout an equivalent of an exquisite Julia Child masterpiece. Derisively called the "Dude Fly" because of its white calf-tail wing, this extravaganza brings the fish up! Best of all, it is a fly the caster never fails to see. To digress for the beginner, keep in mind that you have to set the hook, as the trout will spit the fly out on its dive back into the water. Most beginners miss the take because by the time they react, the fish is safely on its way. Wear Polaroid sunglasses so that you can begin to train your eyes for underwater movement. Early detection allows you to react more quickly. I know a Bitterroot River guide who would float down the Bitterroot River in the dog days of August using a Royal Wulff and sometimes with a dropper!
Presentation: Classic, upstream dead drift.

Humpy (Goofus Bug): Sizes 10-16

tf-redhumpy.jpg

The Humpy's origin, according to Jack Dennis, is shrouded in controversy. Whether the fly originated in Jackson, Wyoming, or elsewhere is really unimportant. What is important to the beginner is that this fly works, and it is an indispensable pattern to have in your fly box. Although it is an attractor pattern, it may imitate a large caddis or stonefly in larger sizes. The fly is ideal for fast-flowing waters because of its inherent buoyancy. The Royal Humpy is especially easy to track in fast water. When sparsely tied, the Humpy works amazingly well on slow waters and can be used to imitate a Little Yellow Stonefly. The great advantage of this fly for the beginner is that it is almost unsinkable, and it offers great visibility in fast water for both the fisherman and the trout. It is, however, a most challenging pattern to tie. The best directions for tying this pattern may be found in The Second Fly-Tyers Almanac by Robert H. Boyle and Dave Whitlock.

Presentation: Classic, upstream dead drift. However, since this pattern closely resembles a caddis fly and floats so well, try drifting the fly downstream under willows or overhanging branches. As the fly drifts to the targeted area, lift the rod tip up to create an erratic skipping motion on top of the water, and then lower the rod tip quickly to allow the fly to drift once again on top of the water. Await the strike!

Renegade

It would appear that the Renegade attractor pattern has faded in popularity over the last 20 years, but it is a great fly for late evening fishing, as the white hackle in the front helps to see the fly on darkened waters. The second advantage is that the dual hackle design keeps the fly afloat when it is difficult to see after sundown. If you are new to the sport of fly fishing, be sure you have a good supply and a range of sizes for the Royal Wulff, the Humpy, the Renegade, the Adams and the Elk Hair Caddis.

Adams/Parachute Adams: Sizes 12-22

The ubiquitous Adams is probably the most widely used dry fly pattern on the North American continent. It imitates any number of gray mayflies. I highly recommend acquiring as many Adams in various sizes as possible. Because of the difficult visibility with this pattern, I have switched over exclusively to Parachute Adams for sizes 16-22. Although this is a generic type pattern, a size 20 Parachute Adams performs quite well during a Trico or Baetis hatch on slow moving water with a nine-foot leader and 6X tippet.

The Trico spinner imitation has a small black body with divided white poly wings in the spinner position. During the heat of summer, get out on a Rocky Mountain river between 7 and 9 am (varies) for the Tricorithodes or Trico hatch followed by the spinner fall.
Although one of the smallest of mayfly species, nonetheless, this is a staple for feeding trout primarily because of the preponderant numbers during the spinner fall. Generally found in slower waters, the trout settle into a sipping, rhythmic rise form. Do not be deceived by the small rings and the dark noses - big fish! Fish in the morning during those dog days of August. I'm sure you will be delighted with the experience regardless of how many fish break off and get away. Because I have trouble seeing a small Trico, I often add on a small Trico as a trailer behind a small Parachute Adams.

Presentation: Classic, upstream dead drift.

Gray Drakes (Heptagenia and Siphlonurus) typically hatch throughout the summer starting in early June. Sizes 10-18.

Tricorythodes typically hatch late in the summer, usu-ally at the beginning of August. Sizes 20-26.

Light Cahill or Light Variant: Sizes 12-18

A light cream color Heptagenia mayfly imitation is another must have pattern. The Light Cahill pattern may also be used on slower waters and lakes to imitate Callibaetis. The Callibaetis dun body is olive-brown, however, so you may want to darken a few of your Light Cahills with a magic marker.

The Light Cahill can be used to imitate Ephemerella or Heptagenia mayflies, but be sure to closely inspect the size and color of the insect, and then match it with your color coded fly selection.

PMD - Pale Morning Dun

Pale Morning Duns are probably the most prolific and reli-able hatch from Glacier to Yellowstone. These Ephemerella drake patterns should be part of your must-have patterns in sizes 16-22. PMDs hatch from June through October. Lighter in color from their cousins the Green Drakes, their bodies range from olive green to pale yellow and tan. The wings are generally slate gray to yellow. PMD cripples should be part of your collection. Nymph patterns such as the Zug Bug, Gray Nymph and the Hare's Ear generally work well. The darker green patterns will work well during a Baetis hatch as well.

The famous Green Drake hatches (Ephemerella grandis) are typically from mid-June through mid-July. If you are in an area with a Green Drake hatch, be sure to stock up on a number of these drake patterns at the nearest fly shop. The hatch is generally not heavy, but if they are out, the trout are looking for them. Reports from guides returning to the shop will determine if you should buy traditional drake patterns or Compara Duns or Green Para-drakes. All of the above patterns range in color from pale yellow to green to olive brown. Stock up.

Elk Hair Caddis: Sizes 10-18

elkhaircaddis.jpg

Unlike the graceful rise and gliding fall of the mayfly, a cad-dis hatch looks like a burst of kindergartners swarming over a playground. An accompanying soundtrack for a mayfly would be a Viennese waltz. Conversely, the caddis dance would be a rap soundtrack by Snoop Dogg. Generally, the caddis will hatch in the evening. The most popular body colors are brown, olive, green, gray and tan.

Caddis flies are not easily missed, and in the pupa and winged stages they are an important part of the trout's diet. Look for them in the quiet pocket water under willow branches or overhangs, especially in the evening. You may also want to select a few patterns for the emergent phase such as a sparkle pupa. For larger caddis imitations use a Humpy or an X-Caddis. Use a Goddard Caddis for fast, heavy water.

One of the guides I worked with collected the caddis cases and tied them on a Mustad hook with a peacock thorax. He fished them on a dead drift on the Big Hole River, and I was impressed! Beginning with the Grannom Caddis hatch in May, caddis emerge throughout the summer and fall. The most consistently popular pattern is the Elk Hair Caddis.

Presentation: Classic, upstream dead drift or erratic ac-tion produced by rod tip action.

Blue-Wing Olive: Sizes 16-22

The Baetis (Blue-Wing Olive) is an important pattern in Montana, as Baetis hatch from May through October. They are generally smaller than a PMD. The body color for a Baetis pattern is olive brown with gray wings and light gray hackle. It is not uncommon for trout to be sipping the smaller Baetis during a hatch of PMDs.

Salmon Fly

Montana's favorite hatch calls for big bugs that hold up under heavy water conditions. They need to stay high and dry. The Salmon Fly pattern is constantly being reinvented and im-proved. During a Salmon Fly hatch, local shops have these flies displayed in tubs and buckets. The Salmon Fly hatch generally emerges late May and is essentially over by mid July. Water temperatures need to be in the low 50s.

Stimulator

The Stimulator represents a pattern for stone-flies in orange and yellow. When the trout quit hitting the big Salmon Fly patterns, especially on Rock Creek, they tend to strike at smaller stimulators long after the Salmon Fly hatch is over. The Stimulator is best used during a Golden Stonefly hatch.

Streamers and Wet Flies
Muddler Minnow:
Sizes 4-8

mudler.JPG

Popularized by Dan Bailey for the Yellowstone River, the Muddler Minnow should always be in your fly box. I have met fly fishers who fish al-most exclusively with Muddler Minnow patterns. Along with its offshoot, the Marabou Muddler, this pattern has probably taken more large fish than any other fly. The Muddler may also be greased up and used as an effective hopper pattern, and I have used it both dry and wet on the same cast with interesting results.

Presentation: Fish the Muddler slightly upstream or down-stream in a quartering action. Retrieve the Muddler by simultaneously pumping the rod tip and stripping in the line in quick, little jerks which imitates the darting action of a sculpin minnow. Allow for pauses, and add weight if necessary.

Woolly Bugger: Sizes 4-8

tf-woollybug.jpg

This pattern is a must for late spring and early summer when the water is high and off-color and the hatches are sporadic. If you are fishing from shore, make short casts around all the rocks and boulders. Be sure the fly is actually sinking to the bottom. Add lead to your leader if necessary. Use a short 2X or 3X leader. Make short casts and keep the rod tip high so that you keep the Bugger bouncing along the bottom. Lift the rod tip when you feel a bump. Do not assume it is just a rock. If it is, lower the rod tip and let the bugger sink again.

Yuk Bug and Girdle Bug: Sizes 6-12

tf-yuk.jpg

I love this bug! I have caught so many beautiful fish during early summer when the water is still high but clear. I float along until I find a logjam or flooded backwater eddy. I usually select a size 10 Yuk Bug. The Yuk Bug has a dark body wrapped with grizzly hackle. Protruding from the body are white rubber legs. I find I generally have to cut back on the length of the rubber legs. I want them to pulse, and I want them to flare at the sides rather than collapsing backwards. I do not use weight. I fish it like a dry fly, allowing it to gradually sink. Most important, I cast from a kneeling position. I am always amazed at how adept large trout are at hiding. As the Yuk Bug sinks into quiet water, the trout will slowly emerge from its hiding spot. I have had large trout appear from under a small tree trunk in shallow water. They never rush to the Yuk. They take their time. It also works well in creeks and small streams. I love this bug!

Nymphs
Hare's Ear Nymph:
Sizes 12-16

In my opinion, this is the best of the small nymph patterns for spring creeks, beaver ponds and slow, flat stretches of river. When I fish high-elevation lakes, I always bring along the Hare's Ear Nymph and a Zug Bug in smaller sizes. They work wonders. If you have someone along who is not an accomplished fly caster, use a plastic water-filled bubble with as long of a leader as possible. Attach a Hare's Ear or Zug Bug and cast out as far as possible and retrieve with a spinning reel. If the fish are rising to the surface, be sure to cast way over them, as the splashdown from the water-filled bubble will spook the fish in the near vicinity.

Bead-head Prince Nymph

This is perhaps the most popular nymph in the region! If you don't have any, head to the nearest fly shop. They work great as a dropper off a hopper pattern during the heat of August.

Pheasant Tail

The Pheasant Tail Nymph is an excellent soft hackle nymph for slow water. The key to this fly is a slender silhouette and a sparely-tied hackle.

Terrestrials
Hopper
(Joe's, Dave's, Jay's, Dan's): Sizes 6-12

tf-hopper.jpg


As you can see from the partial list of Hopper contributors, grasshopper imitations are recorded in the "Who's Who of Terrestrials". Rarely, however, will you find such citations on the bins in a fly shop. For beginners I recommend a clipped deer-hair collar. This feature adds stability and superior floatation. Although the grasshopper is meant to have a low silhouette, without the deer hair the buoyancy is drastically reduced and the caster generally struggles with a sinking pattern.

Presentation: The best source of information on hoppers can be found in the September 1985 issue of Fly Fisherman. In this issue Dave Whitlock, in his article "Hoppertunity", discusses hopper behavior, pattern characteristics and Hoppertunity Techniques. Here are a few of his suggestions: Being a terrestrial insect, the grasshopper is on unfamiliar "ground" when he gets blown on the water. No gentle landings here. Make a splash with your hopper. Strip the hopper in with intermittent twitches from rod-tip action. Use a heavy tippet, and use a twist piece of lead to sink the hopper in those promising pools. Cast close to undercut banks and overhangs where trout hide during low water periods. Fish during the heat of the day. Carefully pick your targeted area. Although a smashing hopper on top of the water will trigger a strike, it also quite often spooks fish in the outlying area. Keep moving and practice stealth.

Beetle Patterns

The deer hair patterns dyed black work wonders. Rick Hafele and Dave Hughes in their outstanding book, The Complete Book of Western Hatches, point out that the Woolly Worm is also a good pattern to imitate a water beetle in still or slow moving water.
Ant

Although ant patterns are difficult to see in small sizes, ants are a staple diet for trout during the summer.

Bead-Head San Juan Worm

tf-sanjuan.jpg

I have always had a certain amount of disdain for the San Juan Worm, but I have a growing appreciation for this pattern during the spring and again late in the fall. I favor the bead-head version with the bead in the center.

Well, there you have it - the 20 patterns that I would never leave home without!

If you actually got this far, and you are a beginning fly fisher, be sure to check out "Mastering the Basics of Fly Fishing" by following the link from this site to my Montana site, www.glaciertoyellowstone.com.

Creeks Are not Just for Kids!

| Comments

ck-fishon.jpg.jpg

In all my years of guiding in Montana, I rarely was able to talk a beginning fly fisher to forego floating a famous Montana river and head for the canyon creeks. It's a pity because one day of instruction on a creek is equal to three or four days on a river. "Mend your line," shouts the guide. "You missed the target. You have to be within six inches of the shoreline, says the guide enthusiatically. "You're casting at the wrong angle. Stay in front of the boat," responds the guide. "Your fly has sunk, and you have line drag," mutters the guide. None of this will happen when you fish a creek.

Instead your guide will be laughing with delight when you miss or land a 7 to 9-inch cutthroat next to every rock and in every pocket. After all, there is basically only three guiding principals to remember.
1. Keep your rod tip high with little or no line on the water.
2. Allow the fly to float with the natural speed of the current. Better yet, let the fly stall.
3. Anticipate the strike and set the hook.
Click on this Montana fly fishing link for a great creek fishing article with lots of photographs. The young model is my son Brandon Archer who returned with me to one of our favorite Bitterroot Creeks.

Fly Fishing Basics: Pretest

| Comments

Mastering the Basics of Fly Fishing

flyshop.jpg.jpg

Mastering the Basics of Fly Fishing was originally an outline that I followed when I taught classes on fly fishing. Working for an outfitter and fly shop owner in Hamilton, Montana, I taught a number of parent/child introductory classes. Later when I set up my Montana Fly Fishing site in the early 90's, I expanded this article for adults who wanted to learn on their own, as well as parents wanting to teach their children the skills of fly fishing. It continues to be one of the most visited sections on my Montana site. The instructional program is broken down into the following steps:

Introduction | Pre and Post Test
Step 1:Selecting Fly Rod and Reel
Step 2: Terminal equipment and Paraphernalia
Step 3: Necessary Knots and Leaders
Step 4: Casting
Step 5: Basic Fly Patterns and Presentation
Step 6: Mastering the Basics of Creek Fishing
Step 7: Mastering the Basics of Stillwater Fly Fishing

boy.gif

Introduction and Pre / Post Test for Mastering the Basics of Fly Fishing

In thirty-two years of being a high school English teacher and fifteen years of being a fly fishing instructor and guide, I have learned a great deal about teaching and learning. Too often, I must confess, I departed from good instructional techniques with predictable results-- a loss of interest or frustration on the part of the learner. Through the years I have watched ardent fly fishermen attempt fly fishing "conversions" with family members and friends --often with the same predictable results.

Attempting to share one's boundless enthusiasm with a spouse or child evokes a host of clichés. Suffice to say there are minefields in all of our backyards that the skilled instructor must carefully clear away. Many families have stories about spouses stepping into the instructor or learner role with disastrous results. Sadly, the same may be said of parents attempting to teach fly fishing to their children.

Too often we expect our enthusiasm as instructor to motivate the learner or novice, and the ensuing frustration on the learner's part or the instructor's part creates tension, which sometimes leads to conflict or withdrawal. To avoid this quagmire, don't loose sight of the most important ingredients for success: fun and rewards.

Ideally, an instructor should be a skilled communicator, knowledgeable, enthusiastic, patient, constantly supportive and realistic in his or her expectations for the learner. Hopefully, the learner has not been "overly coerced", is genuinely eager, has good listening skills and is blessed with superior fine motor skills. If you or your learner lacks any of the above attributes, as most of us surly do, then I hope this manual will help both of you through a sequential skills program. The guiding principle for this manual is the basic philosophy that success needs to be recognized and rewarded, realistic goals need to be established, and instruction should be given in small increments. At all times the instructor and learner need to concentrate on having fun! With each skill lesson, determine how you can make the lesson fun. If you are working with a youngster, how will you reward him or her for mastering a particular level? I started out with flies and gadgets.

Each section provides basic information which should be learned before moving on to the next level of instruction. At the beginning of each skill lesson, a survey will test existing knowledge or skill acquisition. Additionally, practical advice may be offered to the instructor if the learner is a child. Tests are essentially used to review. Avoid using the tests to rate success. Use the test to reinforce and review. Success should be measured on the basis of whether or not you are having fun and enjoying each other's company.

Regarding the age to start children fly fishing, I would offer this advice. First teach them the joy of outdoor recreation. Introduce them to pond fishing for sun fish where they are sure to have success with a nymph and strike indicator. At about fourth grade, when their fine motor skills are sufficiently developed, begin instruction with the clear understanding that the goal is self-sufficiency. Start the program during the winter so that when the first family trout trek arrives, the instructor isn't impatiently giving the learner a crash course. Take them to a small creek. And speaking of small creeks, I would recommend buying the primer, The Curtis Creek Manifesto written and illustrated by Sheridan Anderson. This wonderful angling comic book is published by Frank Amato Publications in Portland, Oregon.

Having got "skunked" his first time out, my ten year old son turned to me and said, "Dad, I like casting to the hula hoops better, especially with all the prizes." It was a chilly May opener and a bungled first experience with a fly rod for a youngster. Later that summer Darin and my seven year old son, Brandon, caught a number of five inch Brook trout on a tiny creek high above Montana's famous Big Hole. Through the years I have seen many fathers completely turn off their children to fly fishing. My two boys were delighted with their catch, but they really didn't want to catch any more than a couple of fish. We had only been gone from camp twenty minutes. Fortunately, I was smart enough to reel in their lines and join them in their search for water snakes. We now share a common bond, a fellowship as fly fishers.

Pre and Post Test

If you are a novice, use these questions to determine areas that you will need to spend the most time. If you are teaching a child, be somewhat selective based on their age and how much they have been exposed to fly fishing.

Step 1: Identification of Equipment

1. If someone gave you just a rod, how would you determine what weight fly line to use with it?

2. What is the most versatile weight fly line for trout fishing?

3. True / False: Rod bend or flex is subjective and based on how slow or fast one's preference is in casting.

4. Although seldom used on small streams, the drag adjustment on a single action reel is valuable under what conditions?

5. Briefly discuss the advantage of a double tapered fly line and a weight forward line.

6. What is a leader butt used for? On a piece of paper, draw a leader butt and identify each of the knots used.

7. What is a tippet?

8. What is fly dressing?

9. What use does a fly fisher have of hemostats?

10. Which is the most common leader length?
3-5 ft
4-6 ft
7-9 ft
12-14 ft

11. What is the advantage of using Polaroid sun glasses?

12. If you are fishing with a floating fly line, and then you decide to tie on a nymph and fish the sub-surface or the bottom of the stream, what techniques can you employ without changing your fly line?

13. What two knots do you have to choose from to tie at the end of a leader butt?

14. Why would your dentist highly recommend that you carry fingernail clippers with you when you go fishing?

15. Look over the following knots to determine which of the six you will need to learn.

knots.jpg

Step 2: Basic Set Up

1. Name the four critical specifications found on all AFTMA fly lines.

2. Rods are designed to cast a particular weighted fly line. The lines are numbered 1 - 12. Which line(s) would be most practical for the majority of your fishing waters? Briefly explain your reasons.

3. Why is it both practical and potentially useful to first add braided backing to your reel?

Step 3: Necessary Knots (Name each of the knots pictured.)

All-knots.gif

clinch.gif

Step 4: Casting

Place a large plate, a hoola-hoop or a pizza box out on the lawn at a distance of 20 feet. Cast your fly so it lands within a foot with three attempts. (Be sure to remove the hook portion of the fly. You may also just tie on a little piece of yarn.) Cast your fly at a plate at thirty feet so that it lands within two feet of the plate with three attempts. Now you have a baseline to measure how much you will have improved after you start the casting program.

Multiple Choice and True/False Questions:

1. A fly fishing rod, reel and line is said to be balanced when:
A. The line weight matches the recommended rod weight
B. The outfit is color coordinated
C. You can balance or hold the rod level on an extended finger with the balance point usually close to where the grip stops and the rod begins.

2. T/F The forward cast is more important than the back cast for distance and presentation.

3. Generally, when casting, the caster wants:
A. An open loop
B. A swing loop
C. A tight loop
D. No loop

lineloop.gif

4. When a caster does not let the line land on the water and continues casting overhead, forward and backward, he or she is said to be:
A. Shadow darting
B. False casting
C. Air line
D. Wasting time

5. What are three useful reasons for the answer to question 4?

6. Viewing the caster from behind, which is the better cast and why?

cant-rod.gif

7. Line drag spooks the fish and frustrates the caster when the faster current pushes the belly or mid-section of the line downstream. This causes an unnatural drag or acceleration of the fly. This constant factor is the fly fisher's greatest challenge to over come. Trout are creatures of habit, and they are conditioned by their environment. Viewing an artificial fly pattern zoom by their lie will not trigger a strike, as it is an unnatural phenomenon; therefore, the fly fisher has to cast in such a manner so as to drift the fly in a natural float. Describe two types of casts or casting technique that may be used to counter this problem of line drag?

8. Which is more important in casting, distance or presentation?

9. A steeple cast or a roll cast is most useful under what conditions?

10. The basic power stroke or casting arc can be illustrated on the following clock. Draw two lines connecting the large dot with the smaller dot or number which will demonstrate where the rod stops on the back cast and forward cast.

blankclock.gif

11. Which lettered illustration depicts the proper pick up of line off the water prior to starting into your back cast? A, B or C?

pickup.gif

12. Which is the best loop for casting?

13. What is a "wind knot" and how is it caused?

14. You find your fly splashing on the water behind you or catching on the grass. What two corrections should you make?

15. What forward casting adjustment could you make if you see your fly smashing onto the water with a splat?

16. If on your forward cast, your fly line and leader drift back towards you dropping into an unsightly pile, what forward cast adjustment do you need to make?

17. If you snap your fly off in mid air on a "crack-the-whip" cast, what forward cast adjustment do you need to make?

18. If on your forward cast, your line hits another part of the line or the rod during the cast, you will want to make an adjustment by _____________ your rod.

19. Most fish are caught on casts of __________
A. 5-10 feet
B. 20-40 feet
C. 40-50 feet
D. 50-70 feet

20. How would you compensate for the wind while casting?

rainbowprint.jpg.jpg

21. Identify the fish in the picture above.

brown.jpg

22. Identify the fish in the picture above.

cutthroat.jpg

23. Identify the fish in the picture above.

brook.jpg

24. Identify the fish in the picture above.

Step 5: Basic Fly Patterns: Identify the following popular fly patterns. See Step 5 for 20 Recommended Fly Patterns.

RoyalWulff-MB.jpg

Adams.jpg

elkhaircaddis-MB.jpg


tf-redhumpy.jpg

tf-hopper2.jpg

beetle-MB.jpg

mudler.JPG

tf-woollybug.jpg


The L.L. Bean Ultimate Book of Fly Fishing by Macauley Lord, Dick Talleur and Dave Whitlock

If I had a nickel for every how-to-fly fishing book that has been published during the last 20 years, I'd be fishing around the world in some pretty exotic places. My article "Mastering the Basics of Fly Fishing" was begun hastily years ago when I was preparing an outline for an introductory course for fathers and sons. Recently I was perusing the shelves for a primer to double check that I hadn't left anything out of my article. The Ultimate Book of Fly Fishing may be an overstatement; nonetheless it is a wonderful primer for the novice or beginner. The book is divided into three sections: Fly Fishing, Fly Casting, and Fly Tying. The photographs and diagrams are exceptional, and I couldn't resist adding another fly fishing book to my collection.

Go to Step 1: Identification and Function of Equipment


Bass and Fly Fishing Links

| Comments

Bass Fishing – Commercial sites with good instructional content
Bass Pro Shops, Outdoors Online. “The Complete Bass Fishing Resource” is not an overstatement.
http://www.landbigfish.com Centering mostly on the Michigan area, this commercial site offers good information; however, you must be a member with a login for archived articles. Good article on jig fishing for trout
Gary Yamamoto’s site and magazine subscription service. Do you want to learn from the creator of the Senko worm? For Senko rigging, follow this link
Kevin’s bass fishing site – a one stop source for bass fishing information." Good articles.
http://www.bigfishtackle.com The page designs are a bit crowded for my old eyes, but this site is a comprehensive bass fishing site with excellent articles.
http://www.bassresource.com Another good resource.
http://www.aa-fishing.com/bass-fishing.html

On-Line Bass Fishing Stores
http://www.basspro.com
http://www.cabelas.com/cabelas/en/templates/catalog/store-home.jsp
www.basssportinggoods.com
http://www.ebait.com

Bass Fishing – Regional: Tourism: Promotional
http://www.californiadelta.org
http://www.delta.dfg.ca.gov/
http://www.westernbass.com If you live out West, check out this site.
http://www.norcalbass.com Central and Northern California bass fishing


Lure Manufacturers

http://www.meps.com

Bass Fishing – Guides and Outfitters with archived articles
http://www.jimporter.org Jim Porter is a published freelance writer with many credits. He has been a TV host, and he runs a guide service in Florida. Good articles.
http://www.nwfish.com Fishing with Oregon’s top guides is a site with good content for fishing for salmon and steelhead on the Columbia River.

On-Line Directories for Bass Fishing:
http://www.yahoo.com/Recreation/Outdoors/Fishing/
http://www.directory.google.com/Top/Recreation/Outdoors/Fishing/Bass/Directories

Search – Fly Fishing Tips

Fly Fishing – Commercial sites with good instructional content
http://www.davewhitlock.com/articles.htm A must visit and bookmark.
http://www.glaciertoyellowstone.com My Montana site. –Dave Archer
http://www.about-flyfishing.com/


On-Line Fly Fishing Stores
http://www.llbean.com/outdoorsOnline/outdoorSports/flyfishing/tips/rods.html
http://www.orvis
http://bobmarriotts.net/


Fly Fishing – Regional: Tourism: Promotional
http://www.glaciertoyellowstone.com A comprehensive fishing guide to Montana by Dave Archer
http://www.oregon.com/fishing.cfm
http://www.jacksonholenet.com/columns/jack_dennis_jack_dennis_fly_fishing_news.php

Fly Fishing – Guides and Outfitters with archived articles

On-Line Directories for Fly Fishing:
http://www.troutlet.com/link/fishing-directories-fly-fishing.htm
http://dmoz.org/Recreation/Outdoors/Fishing/Fly_Fishing/

Misc.

http://www.quickbrochures.net/fishing-books/fly-fishing-books.htm
http://www.schoolofflyfishing.com/resources/tipslibrary.htm
http://www.mustad.no/index.html
http://www.oldandsold.com/articles03/flyfishing14.shtml
Article on streamer fishing
http://www.troutnut.com/naturals/favorites.php
Great nymph photographs
http://flyfisherman.com/skills/ffmstreamers/
http://www.buckeyeflyfishers.com/Articles/fishing_streamers.htm
http://www.landbigfish.com/articles/default.cfm?ID=2406 jig fishing for trout with a fly rod

Soft Plastic Worms and Baits

| Comments

A Beginner's Guide to Bass Fishing

plasticassort.jpg

Soft plastic baits imitate a variety of bass food from worms, salamanders, crayfish and lizards. Soft plastic jerkbaits imitate small forage fish. Let’s begin with the ubiquitous worm that comes in so many variations, sizes and colors that it can be overwhelming for beginners adding to their soft plastic collection. Beginning bass anglers should fish a worm 50% of the time until they master the technique of fishing on the bottom. Fishing close to shore in turbid water with a flipping presentation is probably the best confidence booster a novice can experience. Start out by attaching the worm with a Texas Rig (see glossary for illustration), which slightly embeds the hook point into the worm on a weedless hook. Experiment fishing the worm in all conditions for every pattern conceivable. The best water temperatures are above 55 with the ideal temperatures between 60-65 degrees, especially during the spawn. Watch Your LIne One of the most frustrating nuances that I have yet to learn is to anticipate line movement. If you feel a tick on the line, it is usually the bass exhaling and pushing out the worm when it realizes it is not food. Setting the hook at this point is like closing the barn door after the horse is out. Bass engulf their food when it is on the bottom by opening their mouths and sucking in water along with your bait. When they move off the line will move ever so subtly. This is when you need to set the hook! If you are fishing weedless with an embedded hook, lower the rod tip, take up the slack and heave-ho! If you are fishing wacky style with the hook exposed, a gentle lift is usually all that is required. (See Shastina Lake entry.)


Worm Size: Select a worm 4 to 6 inches long for all-around fishing and 8-10-inches for those elusive, trophy bass. Using heavy line size has two advantages. The first is obvious in that you can fish the worm in heavy cover. The second advantage of a large line size is that it helps slow the descent of the falling worm, which frequently triggers the most strikes.
Common Hook Size: 3/0 and 4/0 hooks

Worm Colors: (photo) A myriad of color combinations await the consumer, but a simple rule of thumb for the beginner is to start with dark colors for murky water and natural or flesh color for clearer waters. One thing is certain, it is hell to be catching bass on a particular pattern only to find that the action stops when the conditions change. Bring an assortment of color to experiment throughout the day. Black and black/blue followed by dark browns with green are the most popular, but everybody has a favorite color combination for a particular condition or pattern. The Senko brand is a favorite, especially during the spawn. Use a weedless hook rigged Texas Style. For information on rigging the Senko worm, go to inside.net

John Fox suggests that if you are fishing during a cold front, keep your boat positioned close to shore and cast out to the deeper water, and then slowly move your worm from deep water to shallow water, as bass move into the deeper water, especially the females. When the front passes, and you have a blue-bird day, work your plastics in the deep section of coves or creek beds. (Be sure to read my review of John Fox's bass fishing video. It is the best instructional video that I have found.)
Hook Set: Watch for subtle line movement or a slight rod twitch, lower the rod tip and reel in any slack, and then hook-set hard – repeat again in 2 to 3 seconds.

Presentation: Crawl the worm slowly. Pause for agonizing long periods! If you flip the worm up on the bank or on a half-submerged log or rock, SLOWLY move the worm into the water. Anticipate strikes when the worm drops over rocks or other obstacles such as a ledge. Bass usually strike on the first or secondary fall. Work the worm slowly to the boat. In deeper water, jig the worm vertically one to two feet with a twitching motion, and then allow the worm to spiral to the bottom again. Always watch the line for movement, as the takes are often very subtle. A variation of the Texas Rigged Worm is to use a soft plastic worm or bait with a cone-shaped, slip sinker, which is perhaps the most popular rigging. A Texas Rigged Worm can be crawled or snaked through heavy cover. Most anglers use a tooth pick to jam in the slip sinker for heavy cover. (photo) Carolina Rig: The Carolina Rig targets bass feeding above the bottom by floating a worm at a pre-determined depth. An egged-shaped slip sinker (1/2 oz. to 1 oz.) is attached above a swivel. The worm is attached on a short leader. Generally the hook is left exposed, as the worm floats above the bottom with an inserted Styrofoam piece embedded in the plastic worm or bait. (You may buy floating worms.) (photo)

Split Shotting a plastic worm simply adds a split shot 16 to 20-inches above the worm on light line. Utilized in shallow water, the retrieving technique of reel-pause-twitch moves the worm along the bottom as a searching pattern for heavily pressured fish. In off-colored water, position your boat within ten or twenty feet of the shoreline and flip your worm to likely cover. Strikes often come on the fall. Silent entries into the water are best, as a splashy plop may spook a bass holding in shallow water. After a pause (experiment with short to agonizingly long pauses) lift the worm again with a little twitch, and pause briefly before you flip to a new spot.
Targeting Spawning Bass: Bass protect their spawning beds by carrying the worm away from the bed, or they attempt to kill it. Since spawning bass are not as hungry as in other seasonal periods, they often pick up the worm in the middle to move it. Attach the worm Wacky Style, which penetrates the hook through the middle of the worm with the point exposed. Cast over the bed and slowly work the worm to the center or edge and then let it rest. Every soft, plastic worm collection should have some salamanders as well. Use all of the techniques mentioned above, but don’t be surprised if the take is violent. Bass hate salamanders and snakes and they attack to kill, especially on or near their spawning beds. While you practice your worm techniques on the bottom, be sure to spend a great deal of your time fishing with a jig as well. Many tournament professionals fish extensively with jigs, especially the Jig and Pig (pork rind).

Jigging for Bass

| Comments

jigs.jpg

General information: The jig, regardless of its size, color or configuration, has one thing in common, and that is the hook has a molded lead head. The size of the hook and the size of the lead head determine whether a grub or a crawdad imitation will be attached. Jigs are best used in cold water in and around heavy cover. Some jigs come with wire weedguards so they are excellent choices for pitching or flipping throughout the seasons. Typically, a jig is fished vertically by lifting it off the bottom and then allowing it to fall back to the bottom. The jig can also be cast to a target and slowly worked up and down as it progresses back to the boat. Jigs may also be embellished with pork trailers.

bassonjig.jpg


Jig Hook Size: (6) 3/0, 4/0, 5/0 (photo)

Jig Skirts / Cover: deer hair; marabou (photos)

Common Jig Head Styles: (photos)
The round head is best suited for vertical jigging, but it does tend to ensnare grass and frequently gets caught in cover. The banana head affords more protection from hang-ups and works well in rock cover. The stand-up jig is designed to sink on the flat weight, while the hook rides upright. The stand-up jig is an excellent choice for attaching other baits. The flat-bottom helps keep the jig from slipping deep into weed cover. The football-head jig works well for weed retrievals, and it too is a good choice for attaching pork rind and other baits.

Ideal Water Temperature for Fishing a Jig: 50-60

jigging.jpg

Presentation: Traditional jigging simply lifts the jig of the bottom in a vertical rod lift, allowing the bait to pulsate down to the bottom. This method is also used to target suspended bass along steep cliffs or drop-offs. Another technique, which is similar to fishing the worm, is to slowly crawl the jig up and over structure, lifting and twitching the jig in a pattern of your choosing. Always be mindful of what you are doing when you get a strike. Make a notation on your fishing log. (Print a log here.)

Hook Set: Quick

Jigs: Grubs, Gitzits & Jigging Spoons
Grubs: (photo) Although grubs, attached to a jig, are excellent choices for cold, deep water fishing in heavy cover or structure, they work most efficiently during the summer and fall. Strikes often come during the grub’s fall, which are oftentimes difficult to detect. Raise the grub off the bottom one to two feet with a quick jerk upwards and allow the grub to twist and turn on its way back to the bottom. Successive repetitions, to renew the jigging process, often sets the hook on a bass that unbeknownst to you had softly sucked in the grub! Light lines on spinning rods work best.

Gitzits (Tube Baits): (photo) Gitzits or tube baits are my favorite plastic bait along with Senko worms. Every beginning bass angler should have many of these baits in multiple sizes and colors. Originally developed by Bobby Garland and his brother Garry over thirty years ago, the Gitzit is a tube bait attached to a lead-head jig. I have had great success fishing smaller tube baits for smallmouth bass on slow moving California rivers, such as the Stanislaus River. Although spinning reels with 8-10 weight lines are most recommended, my favorite method for fishing these baits is with a fly rod “casting” downstream from a kick boat. (Click here to learn more about Fly Roddin’ for bass.)

Use the same jigging techniques as mentioned above as well as the slow crawl--pause technique. Flipping is a popular presentation using a drop-shot or rigging the tube Carolina style. Although most experts dissuade rigging the tube Texas style, I have found that when fishing for smallmouth in current with, my best results were with a Texas rigging. The number of missed strikes pales in comparison to hang-ups in current.
Recommended Links for tube bait fishing:

Bassresource.com provides an excellent review of tube fishing from a pro.

Recommended Videos: If you have never fished with tube baits, buy the video Gitsits with the Garland Brothers, a Bazz Clazz video. Read my review on the Gitzit tape. If I had a 5-Star rating system, this one would deserve 5 Stars!

Jigging Spoons: Jigging spoons, usually in silver and gold, are favorites for suspended bass on steep drop-offs. Be sure to use a weedless model in heavy structure. Weedless jigging spoons are also popular when fishing gunk. Cast the lure on top of the weeds or moss, pause, and then slowly crawl the spoon to a small opening and allow the spoon to sink to the bottom before you begin jigging. Be attentive as a bass may take the spoon on the fall to the bottom.

Recommended Links for Jigging Spoons:

Jig and Pig: For as long as anglers have been using lead-head jigs, they have been garnishing these fish catchers with pork rind to simulate crawfish. This combination is best utilized in colder water for larger fish. One such popular product is Uncle Josh’s pork frog and little crawdad. Keep in mind that during the spring female bass, especially smallmouth bass, gorge themselves on crawdads. So a Jig and Pig in crawdad colors or crawdad lures work especially well during this pre-spawn period when the females bulk up in preparation fo the spawn.

Jig and Pig Fishing Articles
http://www.tackletour.com/reviewunclejoshjig.html

One of the best on-line articles on jigs is written by Russ Bassdozer; this jig fishing article also includes links to other great articles on jigging.

Bassresource.com provides a short but sweet review of jig fishing.

Moving Up from the Bottom

plugs.jpg

General information: The Crankbait is a diving lure designed to represent forage fish. The diving depth is determined by the size and angle of the lip. Crankbaits can run in one foot of water to 20-feet of water in many conditions, which makes it as versatile as fishing with a worm. Crankbait manufactures note the diving range on the package of their containers. Characterized by a darting and wobbling motion, most crankbaits float to the surface at rest. In addition to their life-like animations, a secondary advantage of the crankbait is that they are extremely snag resistant, as the lip and bulbous body serve as a deflecting shield for the attached treble hooks. Hard body Jerkbaits are generally more streamline to represent shad baits. They have the same characteristic diving bill and perform very similar to the crankbaits. The primary difference between a crankbait and a jerkbait is found in the two names. Crankbaits are designed to be cranked at a consistent retrieval speed; whereas as Jerkbaits are generally fished on the surface or in shallow water conditions with the retrieval incorporating quick jerks to the lure. (Yes, there are soft plastic jerkbaits as well.) Before you randomly select crankbaits or hard-bodied jerkbaits for largemouth bass, research the type and size of the predominant baitfish in your local waters. Long casts provide a longer retrieve for the targeted depth of the lure. Rattlebaits, as the name suggests, are hollow bodied diving lures with shot added to the body cavity. They do not float, and they are lipless. Aside from their appealing gyrations, Rattletraps add sound to their fish catching appeal, and their slanted nose protects them from snags and debris. Because of their weight, they may also be used to jig the bottom.

Line size: 15 to 17 pound monofilament line is most common.
Colors: The colors and patterns are endless. Research your waters for the most predominant forage fish to help in pattern selection.

Presentation: Make long casts in order to achieve the diving depth the lure is designed to reach.
Tip: In addition to keeping hooks sharp after run-ins with snags, a crankbait can be tuned to run left or right, which is an advantage when fishing the shady side of a dock or pilings.

Spinnerbaits / Buzzbaits
General information: Popularized in the 1960’s, Spinnerbaits have been referenced in catalogs and literature since the late 1800’s. As the name implies, the jig-type bait is attached to a v-shaped wire. At the base of one side of the “V” is the jig body with hook and an attached skirt usually made of rubber or plastic. The other side of the “V” is reserved for the spinner blades (one or two). The spinnerbait is most effective in the warmer months when bass are active, and it is an excellent searcher pattern in shallow water. The most popular spinnerbait is the ¼ oz. in black or white with a number 4 or 5 French or Colorado blade. Tournament angler and television host John Fox states in his video, How, When & Where to Catch Bass that thirty tournament professionals were asked the following question: If you had to select one lure to fish an unfamiliar lake, what lure would you select. Twenty-nine responded that they would choose the spinnerbait. Read Dave's review of John Fox's excellent national bestselling video on bass fishing.

Blades and blade finishes: (4)(5)(6) larger, rounder blades such as the Colorado blade keep the lure lifting upwards; use #2 and #3 blades to pull the lure deeper. The smaller willow leaf blades work best in grass or weeds with minimal vibration. (4) The Indiana blade is the intermediate choice. Blade finishes should be selected based on the clarity of the water. Silver or nickel reflects the most light, but one must be careful not to spook fish with too much flash. Hammered copper or brass is the most common choice for warm, slightly turbid water conditions. Select a dark or black blade for muddy or murky water where sound and silhouette is most important.

Skirts: chartreuse, white, black are the favorites.

Trailer hook (stinger): The trailer hook should be the same size as the spinner hook and placed so it is positioned upwards with a rubber keeper.

Added Dressings: Some anglers add a pork frog or pork eel.
Presentation: One advantage of a spinnerbait is that it can be retrieved slowly or quickly through a variety of conditions. It is an excellent lure for reflex strikes. Cast to the shady sides of cover, and don’t overlook bouncing the spinnerbait off a rock or branch and allowing the bait to flutter underwater before starting the retrieve. Smaller spinnerbaits are best used in cooler water in the spring or fall. Scale down in size and speed retrieval for cold water.

For a thorough presentation on fishing spinnerbaits, read Largemouth Bass an In-Fisherman Handbook of Strategies. (ISBN: 0-929384-11-3) or John Weiss’ book, The Bass Angler’s Almanac (ISBN: 1-58574-314-7. Read Dave’s review on his pick for best bass fishing books.

Buzzbaits: Similar to a spinnerbait, Buzzbaits have attitude. They’re great for shallow water fishing over flats with weeds barely reaching the surface. They are noisy, surface lures, and they are very effective when fished over active fish in off-colored water with temperatures of 60-degrees and up.

Topwater Plugs and Lures

| Comments

The Dry Fly Equivalent

topwater.jpg


General information: Credited with the first commercially produced topwater plug, James Heddon, founder of the Heddon Tackle Company, began a fishing revolution with his wood-carved frog plug. Heart stopping surface attacks are the hallmark of topwater plugs and lures ever since Heddon introduced his solid, wood-bodied lures. The topwater category is broad and covers traditional plugs, buzz baits, prop baits, surface running crankbaits, chuggers, poppers and hollow bodied frogs. During the spawn bass will hit a topwater lure to protect their spawning bed. Cast beyond the bed and slowly reel it into the zone and stop. Roland Martin recommends waiting for ten or more seconds and then slightly twitching the lure. Repeat this procedure and then pull the lure under the water to the center of the bed and then allow the lure to float to the top. Repeat the procedure. The male bass is likely to strike at any time during the sequence. Cast a plug to any feeding bass early in the morning or at dusk. Fish a plug during the heat of the day into downed trees.

Frogging:

Fishing from a Kickboat

| Comments

maxonraft.jpg

Part I: Safety, Preparation and Rowing Techniques
Part II: Advantages of Kick Boats and One-Man Rafts
Part III: Float Fishing Strategies

bestboys-boats.jpg

When I moved to Wyoming in my twenties, I signed up for a hunter's safety course. At least thirty people of all ages shuffled into the Game and Fish meeting room and took their seats on the folding chairs. People talked quietly, as if they were in a church. Presently a uniformed spokesman, after some preliminary discourse, asked a profoundly simple question. "How many of you attending this Hunter's Safety Class have experienced an accident or a near accident involving firearms?"

I was shocked with how quickly at least three-fourths of the attendees raised their hands. I was also struck with the honesty and quickness in raising their hands. My own hand had been slow to rise, in part from some deep seated shame of having pointed an "unloaded" gun at an adolescent friend with my finger on the trigger. Fortunately, a respected family member's instruction a year or two previous to this horrific moment came to the forefront of my senses, and I lowered the .22 rifle. I opened the chamber for my friend's inspection. When the .22 shell ejected, I apologized and made a hasty retreat to the bathroom where I quelled my nausea.

driftboatwreck.jpg

I would submit that any assemblage of river floaters, if asked to raise their hand owning up to a water accident or boating accident, would be slow to respond, not from a lack of honesty but out of sheer ignorance. Unlike firearm accidents, boating accidents do not have a smoking gun. They do not have a pulled trigger. What they do have is a perilous temptation with death or injury that is perpetrated out of ignorance or carelessness. Unlike the discharge of a firearm, with its instantaneous report of death or injury, potential river tragedies often go unnoticed. Float fishing from a personal water craft rewards anglers with increased fishing success and miles of scenic beauty; a successful outing, of course, requires safe preparation, good rowing skills, self-rescue knowledge, along with effective fishing techniques.

Recently, my son Brandon, on reading the article, commented on the "dark side" of this article and the references to death. He told me, "You might as well tell them to go out and buy a crotch-rocket motorcycle and drive like hell without a helmet! Be sure to tell your readers how much fun it is to float fish. Lighten up, old man." In retrospect I realize that I have presented a grim picture of danger. On any given weekend in Montana during the fishing season, hundreds and perhaps thousands of anglers safely enjoy the rewards of float fishing on streams and rivers across the state. It is true that sad accounts of death by boating accident leap to the top of the front page. Perhaps it is my age that I reference the dangers in this instructional article on safe river float fishing, or perhaps it is my own foolish recollections of a few of my own experiences and witnessing of near tragedies that clouds the text. At any rate, the important fact to remember is that safe float fishing is so much fun, as Brandon reminds me.

familydanger.jpg

Safety
Anyone who has lost a loved one from a boating accident knows the importance of wearing an approved life jacket. I have always distained wearing a life vest, as they are hot and get in the way of my casting. After a near drowning accident at age 60, I wear a suspenders vest with an inflatable C02 pull-string. I don't even know that I have it on, and I do keep it on even in shallow, innocuous looking water. Keep a lifeline or throw rope handy, especially if you are floating with a group. Bring along plenty of rope and a first aid kit. A dry bag for extra clothes is essential. Keep this bag where it can be easily reached. Add to this bag the necessary provisions for starting a fire, and be sure to throw in some extra batteries for the flashlight. For years I carried a flare in my dry bag when I floated in the late fall or winter. A flare is a quick fire starter. Beware of the vagaries of weather. Hypothermia is always a present danger in the mountain states. Even water temperatures in the 50s can drain one's strength and rob the body of heat. Being immersed in water temperatures in the high 40's is an instant shock to the system. Strong swimmers without life jackets have perished under these conditions, especially when the air temperatures are in the high 60's or low 70's and floaters have shed outer garments.

A good knife and rain gear is essential. The biggest safety tip is the most obvious and most often overlooked: the oarsman should be completely sober and alert at all times. This means scanning the river ahead 100 yards at a time and pulling over to scout any difficult passage. Taking your eyes off the river or helping a buddy land a fish is the primary factor in many river accidents. Prior to launching, examine all of the equipment for damage.

checkequip.jpg

The next step is preparedness. Call the local fishing shops or rv parks close to the river and ask for updated river information, or ask for the name of a local guide or ranger. Each year after spring run-off, professional river runners navigate stretches of the river noting new channels, strainers and sweepers. This information gets passed around locally and shared with everyone who asks for it. Beginning floaters need to understand the power and dynamics of moving water. The most common obstacles or dangers are in-stream obstacles such as rocks and boulders, strainers, pillows, hydraulics, chutes and cliffs, which deflect the full force of the current. Shoreline obstacles also include rocks, strainers and sweepers.

highshot2.jpg

Broaching and obstacle sideways in a boat creates "a clear and present danger." With the possible exception of allowing the current to spin the boat backwards with the rower facing upstream, broaching a boat or raft is clearly the most dangerous position a rower faces. Sweeping broadside into an obstacle requires instantaneous reaction. Any delay and a rower is at risk of the obstacle sucking the boat down under the water, sometimes creating a wrap-around effect.

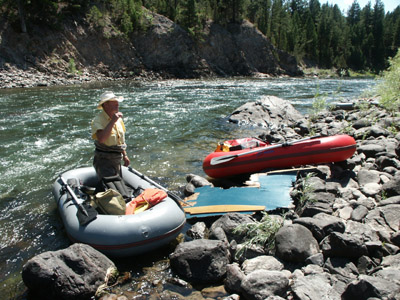
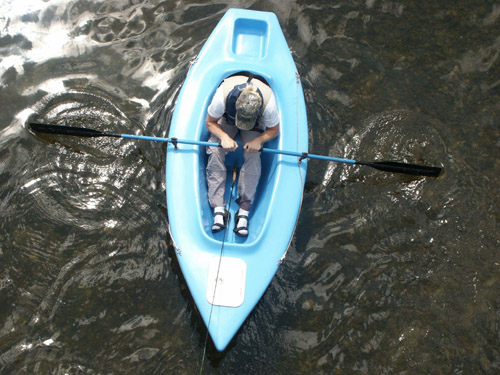
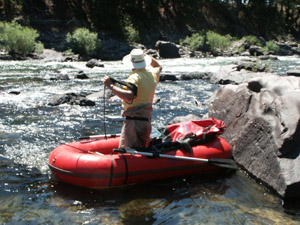
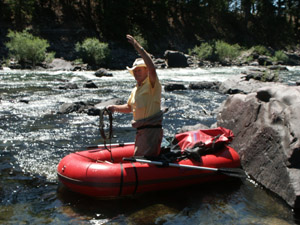
Broaching Escape Maneuver: In the following photograph, Dave Inks, inventor of the Water Strider one-man raft, demonstrates how to escapes broaching a rock. He quickly pulls on his right oar, which spins him around to the side of the rock. He has already pulled in his left oar, and with his left hand he can push off the rock. What he doesn't do is lean too far into the rock, nor does he panic and shift his weight upstream, which could easily flip the boat, as he completes the maneuver.

inksbroaching.jpg

broachsuccess.jpg


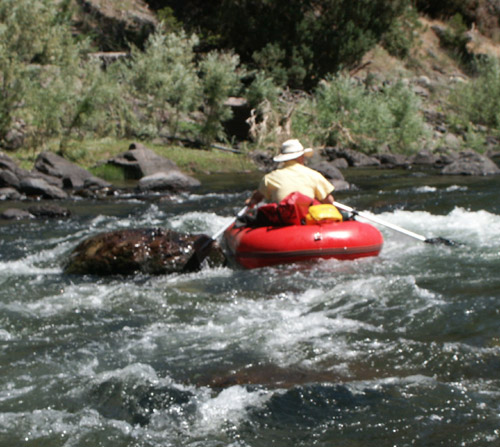
(Note: I asked Dave to wear a life jacket and he declined.)

When I was a young fly fishing guide in Jackson Hole, Wyoming, I was guiding an elderly couple on the Snake River early in the summer. The water was very cold and still flooding its banks. I decided to take a small side channel. The tall meadow grass spilled sparkling rivulets of water into the side channel, and the pebbled bottom cast glittering rays of stream light. Wildflowers were abundant, and the cottonwoods showcased their new, yellow-tinted foliage. The Tetons loomed over us still snow-capped with their majestic, cragged peaks. We all sat in silence just taking in the scenery.

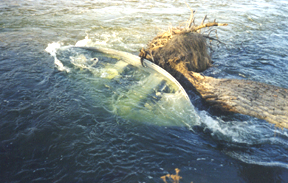
Rounding a corner we picked up speed as the gradient dropped. Suddenly in front of us was a strainer, a bare, single cottonwood trunk angling up out of the water and facing upstream. Strainers are extremely dangerous because the current is pulled downwards as it courses over a partly submerged tree. Wrapped around the strainer underwater was a green, seventeen foot Coleman canoe. We quickly glanced up to the bank overlooking this scene of disaster and observed three sullen men. I pulled into the eddy under the verdant bank they were resting on and asked, "Is everyone alright?" They were drenched. One man avoided our gazes entirely by resting his head between his knees. Apparently, we had just missed the accident. One of the men soberly replied, "We're alright now, but it was a close call."

The lady client turned to me with a quizzical look. I too was perplexed. At the deepest spot in this side channel, and on both sides of the strainer, the depth of water was no deeper than two and a half feet. Below the strainer the water welled up across a shallow riffle. The entire pool was less than ten yards long, and yet these men had ashen complexions and were clearly in shock.

It was impossible to extricate the canoe with four strong men. I thought it was a useless folly, but I joined in to help the men, as I sensed they needed to do something besides silently staring at the water. The force of water kept the collapsed canoe in place. I offered them a ride to the highway bridge. The nearly drowned victim said nary a word. The other friend was also reticent about sharing information on their mishap. The third man spilled his guts. He couldn't stop talking.

Captains and titans of the business world, these three imagoes were on a mission to buy a ranch or spread in Jackson Hole. Since it was a warm day, on impulse they decided to float the river. They stopped in at a sporting goods store, picked up a canoe and some paddles, bought a cheap ice chest and stocked up on beer. Life jackets were considered a frivolous expenditure for this spontaneous expedition. They drank heavily all day. By their own admissions, they had a number of close calls and near misses with the canoe. Each incident they roared with laughter and reached for another beer. Wanting to slow down a bit and enjoy the scenery, they took the side-channel and let their guard down. After all, it was shallow water.

On one of the turns through the meadow, the canoe turned sideways. The men laid down their oars and drank their beer, laughing out loud at all the anecdotal stories they would be able to tell their friends and family. Coming around the final corner, the water compressed into a fast riffle. Their view was obscured by the tall grass on the banks. They made no effort to straighten their course. Dropping down the riffle into the pool, they saw the strainer. The men clumsily grabbed their oars knowing they were going to capsize, get drenched and pull their laughing bodies up on the shore. It worked just as they had planned.

Into the water the man at the bow of the boat and the stern of the boat fell. Gasping for breath from the cold water they slipped and fell and dragged themselves up to the shore laughing like boys who had just pushed each other into a swimming pool at a birthday party. It was more than a minute before the duo realized they weren't a trio. They bolted upright and were stunned to see a scene completely absent of their friend, who had been seated in the middle of the canoe. The canoe was now under water and completely wrapped down both sides of the strainer. The top of the cottonwood was bouncing in agitation, as if it was in pain from the foreign obstacle enveloping it. The men shook off their stupor and charged for the capsized canoe.

They could feel the body of their friend under the canoe. He was wedged at the waist at the bottom of the tree trunk in less than three feet of water. His upper torso and his legs divided the strainer's sweep from the bottom to the surface. The two men could neither budge the canoe nor extricate their friend. Finally, one man pulled his friends legs downstream, while the other friend dove under the water and pushed the head and trunk up and around the trap. A couple of minutes had elapsed. The victim, thankfully, had just taken a deep breath as he glanced below the tip of the outreached tree trunk. He fought with all of his might to turn and twist free while under the water. At the moment his lungs gave out, he felt his friends tugging and pulling on him. He regained consciousness when they pulled him ashore.

Many years later I pulled a baby from a cottonwood tree in the middle of a slow section of the Bitterroot River, just behind Hamilton High School. In their panic, the mothers kept diving into the water only to be swept below the tree and the stranded baby. When I came into view around a turn in the river, the women were screaming and waving their arms hysterically. I began pushing on the oars. I couldn't understand a word they were yelling, and then I spotted a year old baby.

The mothers had been inner tubing on a hot summer day with their children. None of them had life jackets on them or tied to their tubes. The hysterical mother with the lost baby had prudently prepared her baby for the float trip behind town. She placed Angel Wings on her baby's arms. In truth, the Angel wings saved the baby's life. When the current sucked the baby down between the branches, the arm floatation devices jammed in the branches. When I pulled up close to the drowned tree, I observed that the baby was face up. Her mouth was barely above water. She was coughing and spitting up water. The rescue was neither gallant nor noteworthy. I did not calmly return the baby to the mother. My own shock set in, and I found myself angrily lecturing this poor, sobbing mother as I delivered the baby to her arms. Later I felt miserable about my reaction. It was clearly not appropriate for the situation.

sunk.jpg

One nemesis for float fishers is sweepers. As the name implies, half-fallen trees overhanging the water lie in wait for anglers who concentrate more on their fly than the river ahead. After I gave up guiding in western Montana, my wife and I opened up a bed and breakfast establishment for fly fishers. I offered guided float trips on gentle sections of the river. Since I was not operating as a guide or operator of a boat or raft, I felt I was free of any liability in case of an accident. I gave a presentation the night before on oaring and safety. I repeated all the points prior to launching the next day. I insisted everyone wear life jackets, and I reminded them that we were all captains of their own little boat, and they were fishing and floating independently. In one summer I had a teenage boy and an elderly man knocked out of their small boats by sweeping branches. My son Darin was taking a business law class at the University of Montana. When the professor heard about these two incidents, he impressed upon Darin that I was risking a major law suit that I would lose. I ended the trips. I too have been surprised by sweepers on occasion. The advice seems too simple. Keep looking up and targeting obstacles for at least a hundred yards!

lookahead.jpg

. A Hydraulic is a powerful, deep hole, which is usually found below a diversion dams (weir) or at a confluence with another river, when the water drops over a ledge. They should always be avoided. Sometimes they look very safe. Avoid them by portaging.

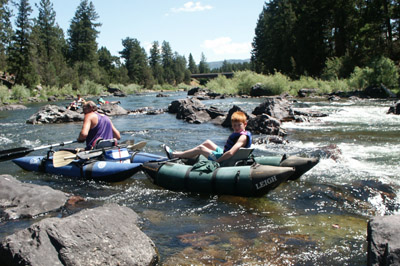
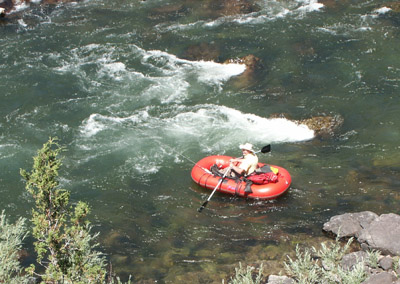
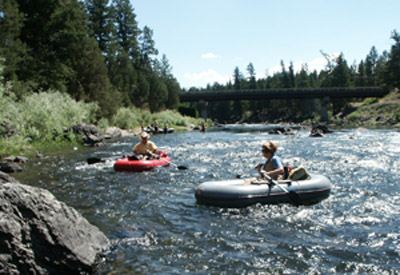
As a beginning rower, the beginner should immediately look for his or her first obstacle. An obstacle can be a mid-stream boulder, a strainer, a sweeper, a narrow chute, partially submerged rocks, current breaks, hydraulics and any other potential danger. It can even be the bank or shoreline that the current is moving towards. Once the first obstacle is established, the rower should position the boat so that the bow is facing the obstacle with the stern of the boat partially facing up stream. The rower is now in a position to row away from the first obstacle. As the rower faces the first obstacle, he or she should glance downstream for the second and third obstacle. Note in the following photograph that the first rower has allowed her boat to turn sideways, a dangerous position. Although Dave Inks' rafts are quick to respond, one should stay in the correct position to immediately row away from an obstacle. Note the angle of Dave's boat.

badboatangle.jpg

Look at every obstacle closely. Don't over react and expend a lot of rowing effort when a few pulls of the oar will be sufficient to slip by the obstacle. However, if the current is swift, and you are on a collision path, start ferrying your water craft laterally across the river away from the obstacle. Many beginners make the mistake of allowing the stern, or the back of the boat, to slip downstream ahead of them, which leaves them facing upstream in a dangerous situation. To avoid this keep the bow downstream with the stern at a 30 to 40 degree angle. In this position the rower will make progress across the stream away from the obstacle. Keeping the stern of the boat at an angle allows the boat to make progress laterally without danger of the stern of the boat spinning around. Rowers should never get in the habit of trying to push a boat to safety. To row away from an object, begin by thrusting your arms and the oars directly facing the object.

armsout.jpg

Dip the oars into the water (not too deep), and pull the oars to your chest. Most of us have more muscle, pulling power than pushing power.

boating-pull.jpg

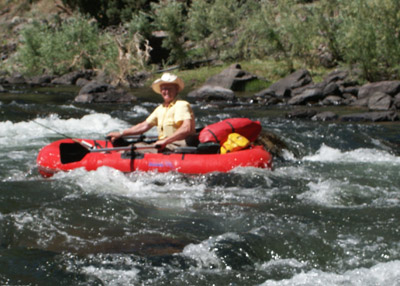
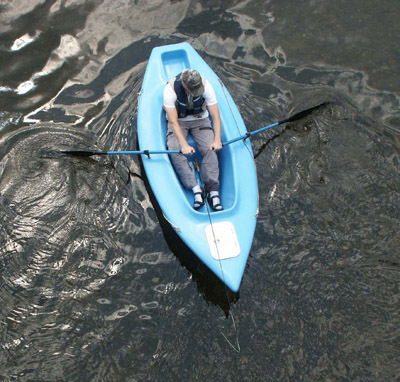
Prior to floating a Class II or Class III river, practice spinning your craft 90 degrees, 180 degrees and 360 degrees from both directions. My son Brandon Archer demonstrates this technique in one of my Little Dippers. In the photograph below, Brandon pulls on his left oar while simultaneously pushing on his right oar. Practice these maneuvers until they become second nature or reflexive.

bestpush-pull.jpg

High Siding is an accident waiting to happen on the water. When passengers shift to one side of the boat, the weight shift tips the boat and robs the rower of his control. It is not uncommon to have someone spill out of a raft or drift boat when embarking for shore in shallow water. Someone falling and hitting their head on a rock can easily be avoided. The rower should take charge when he anchors the boat near the shoreline to exit passengers. The rower should exit first. If the water is not too deep on the outside, the rower should stand a thwart towards the middle of the boat and steady the boat as one angler at a time exits without rods in their hands. The easiest maneuver is one leg at a time with a shift in weight balance. Hold on to the gunwale or raft frame firmly. The rower can lift or tilt the boat slightly to help the departing passenger.

High Siding while the boat or raft is in motion rarely happens. People just know the obvious. High Siding on a strainer or a pillow seems to be a natural reaction that places everyone in the boat in danger. My first boating accident was when I had been guiding for three years in Montana. It was spring and the waters were high, fast and cold. Although the white water enthusiasts were enjoying themselves, it was folly to fish. My outfitter had out of town guests who wanted to fish large nymphs. I insisted they wear life jackets and belts on their waders. One of the clients did not have a belt, so I gave him mine. When I went to put on my own life jacket, I was surprised to discover that I had inadvertently grabbed a child's vest. This was probably twenty-five years ago, and I was wearing Seal Dry waders, a thin latex plastic wader that stretched and ballooned out like a sea anchor.

I was being as cautious as I could be. The clients were asking to move in closer to the shoreline and the spring sweepers. One of the gentlemen was fishing with a rod he had built. He was clearly proud of his creation. He was fishing with a lead-core shooting head with weighted Woolly Buggers. I repeatedly reminded him that he was catching the bottom, and with the speed of the current, if he hung up, the rod would be jerked right out of his hands. Right after the second caution, he hung up. His rod bent in an unbelievable arc, and he shifted the rod to the upstream side of the raft. He uttered something between a sigh and a short whimper and reluctantly surrendered the fly rod to the swift current.

I shot a glance downstream and noted the strainer towards the shoreline. I was convinced I had enough distance to save his rod. I spun the raft around using the push-pull oaring technique, flung the oars to the center of the raft, dropped to my knees on the bottom of the raft, leaned overboard and grabbed the tip of his fly rod. I jumped quickly to my rowing seat and gauged the distance to the outstretched tree trunk looming up in the middle of the river. I was lined up to broach the strainer dead even on the side of the boat. No problem I thought to myself, but when I leaned on the oars, I was shocked to discover how fast I was floating and how little progress I was making.

I faced a dilemma that all beginners should understand without equivocation. Never try to push the boat with the oars. Always pull away from the obstacle. I correctly reacted to the situation once I realized I was going to broach the strainer. I spun the boat around so that the bow was now facing the obstacle straight on. I yelled to the two men up front to reach out and push us away from the tree trunk, while I tried another hard pull on the right oar. It was a successful maneuver. We were just going to take a glancing blow. I didn't even need their help.

Just as I touched the strainer on its side, the two men stood up in the bow of the raft. I went mute as I watched in astonishment. Standing on the soft floor of the raft, both men leaned over the side and pushed. We were instantly high sided, and the bulging water along side the strainer pulled the boat under and flipped the 14-foot raft, all its equipment and three men like paper dolls. The two men floated over to the shoreline easily. When I came up to the surface, my waders had ballooned out with water, and I immediately began to sink, but not before I grabbed a roped which was tied to the side of the raft. Dropping down into a set of waves, I got spun around under the tipped raft. Then I lost my rope grip on the left side of the raft when I large wave pulled me completely out of the water.

I dropped under the water like a cannon ball falling off the poop deck. My eyes were open, and I could see trailing branches from a willow tree. I managed to grab a thin branch no thicker than my thumb. It was the last bush I could have grasped. A few yards downstream a log jam pulsed and shook from the current.. After I dropped off my two clients and filed a report, I went home to an empty house. I had just gone through a divorce. I was in shock for hours and couldn't sleep. The news of my accident spread through the guide ranks up and down the valley. I was ashamed of my incompetence and poor judgment, and I dreaded meeting the other guides. Strangely, no one ever made reference to my accident over the next fifteen years or asked me about it. I should have talked about it. It still haunts me to this day. I jeopardized the lives of my two passengers for a fly rod.

When you need a rowing break, and you find yourself in dangerous, boulder strewn waters, look for an Eddy - a pocket of quiet water behind a large boulder or a narrow slice of shoreline from a slope or boulder field. The water tends to circle around and move upstream. Here you can rest quietly by just feathering the oars before you push off again.

pulltosafety.jpg

Always scout the river ahead. If need be you can easily tie a line to your boat and safely walk the boat through a dangerous section. If you are in a group, the most experienced rower should be the lead rower. He or she can wave the group on if the route is safe. Let the leader navigate through the rough section first, and one-by-one the rowers behind may follow his or her path to safety.

scanahead.jpg

wavethemon.jpg

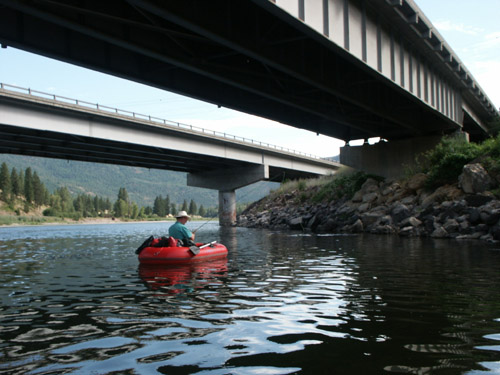
Sometimes a Pillow, which is an up surging pillow of water when a strong current is pushed up against a bridge abutment or large rock, can actually deflect you away from the wall, abutment or cliff. However, they are, nonetheless, dangerous and the rower should take action to avoid them.

These are just some of the challenges of floating a river. Beginning float fishers should begin on slow, moving water in order to practice good rowing techniques and casting techniques. Only experienced rowers should attempt to navigate mountain streams strewn with boulders.

bestcourse.jpg

Instead, practice boat handling skills and fishing skills on slow moving waters that hold big fish. What follows is a quick summary review.

inks4.jpg

Summary Review: One of the best books that I have read on river floating is Stan Bradshaw's book, River Safety. ISBN: 1-890373-08-7

1. Wear a Life Jacket at all times.

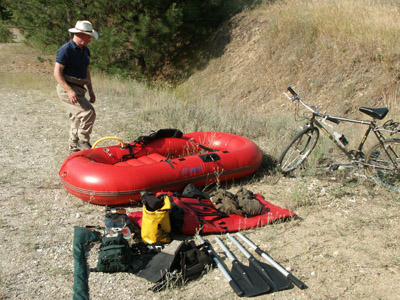
2. Stock your Dry Bag with safety provisions. Include the following: a first aide kit; a pocket knife; extra clothes and rain gear; a stocking cap; rope; flash light; food; a plastic tarp; water bottle and water filter; patch kit.

3. Obstacles: Look for your first obstacle, such as the current pushing into the approaching bank. Other obstacles are rocks, side-currents, sweepers, strainers, hydraulics, log jams, bridge abutments etc.

4. Practice ferrying across current, and practice the push-pull oaring technique for quick boat maneuvering.

5. If you are thrown or tipped out of your raft, roll on your back with your feet facing downstream. In this position you may push off rocks and other obstacles. Once you are in the clear, swim for shore. (Bradshaw's book is filled with self-rescue techniques, as well as assisted rescue. It should be required reading!)

6. Check out river conditions prior to launching, and be prepared for adverse weather changes.

7. Always scout challenging or dangerous water. If necessary, line-out your boat or portage around the section.

8. Always keep your boat pointed at the next obstacle. Be prepared to PULL the oars. Your boat should be at a 30 to 45 degree angle.

9. Keep looking ahead as far as a 100 yards. Do not allow your fishing to interfere with safe boating practices.

10. Never drink or take drugs prior to floating a river, and certainly not while you are on the water.